Building a Magic Mirror
Now it’s time for something completely different. Lately I’ve been watching some great videos from Matthew Perks, he has a YouTube channel called DIY Perks. This inspired me to pick up my own little project to create our own Magic Mirror.
What is a Magic Mirror
Well, there is not so much magic going around here. A better name would be a Smart Mirror. Basically it is nothing more than a monitor behind a double-sided mirror, powered by for example a Raspberry Pi. A double-sided mirror is not a regular mirror, but it’s reflecting coating has about 70% reflection and 25% light transmission. So if you place the 'glass' on a dark surface, you would see just a mirror. When you however put a light source behind it, you’re able to see through it. If you put a black page on the monitor, add some widgets on them, they seem to be part of the mirror’s reflection. A Magic Mirror is a great and simple example of an 'internet of things' device.
Circular economy
For this project I started with an old iPad (first generation). It was nothing more than a paper-weight, since the OS was too old to be of any practical use. All the electronics where working, and since there was nothing wrong with it, I was not able to throw it away. I found out that this iPad does not have the screen glued to the case, but uses some iron clips to keep it in place. That made it possible to get the screen out, and use it for the project. It’s also nice to know that the screen can be used as a monitor when you have a fitting controller board. Together with my Raspberry Pi and an old AC adapter that powered my former Wi-Fi router, I was able to create my shopping list.
Shopping list
-
A controller board to power and use the LCD screen, I used this one. (25 Euro)
-
A frame to put the mirror in from 30x40cm. (7 Euro)
-
The acrylic mirror that fits the frame (30x40cm). (17 Euro)
-
A bakelite mounting plate for the back (or use wood) (9 Euro)
-
Some foam (6 Euro)
-
Strong Double sided tape (7 Euro)
-
Some Circuit board holders (3 Euro)
So ex shipping fee, I needed to spend about 75 Euro on raw materials.
The screen
Starting off with the dismantling of the iPad This was the most 'scary' thing to do, since it is easy to break the screen. I also needed to find out if the controller board actually works, exciting!
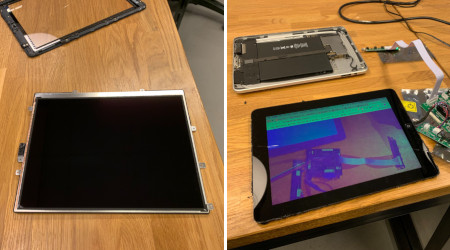
As you might notice, during the dismantling, the glass broke, luckily the LCD screen itself remained intact!
Putting it together
Now that we have our working screen and components, let’s put it all together. After making a hole where the connector for the screen is located, I placed the screen on the board using double sided tape. After that, I surrounded the screen using foam, so there is a flat surface for the acrylic mirror. Now the rest would be easy, just place the mirror in the frame, then the screen on top of it.

Software
Although it would be nice to create your own software, for now we’ll just settle with a pre-build version: MagicMirror. This is a nice and easy Open Source project that works 'out of the box'.
Final result
Though there might be some improvement possible, I’m quite happy with the result! Time to build your own?

