How to hack a box - Exploration
Welcome back to the blog series about how to hack a box! In the first blog I gave an introduction into the steps and prerequisites on How to hack a box. In this second post I’ll guide you through the first step, which is exploration. We will execute the steps on an actual box in Hack The Box, called Blocky.
| DISCLAIMER: Never attempt to execute one of these steps on a machine where you don’t have explicit permission for from the owner. This is illegal and will get you in trouble. |
Introduction
In the first step we will start exploring the box and gather information that we might be able to use in our next step: Gaining Access. We can use various tactics for this, depending on the situation. In our case, we only have direct access via IP, not for example physical access, nor the ability to sniff wireless communication. When hacking a box in Hack The Box, you won’t have any interaction with users from the system, so that narrows down our search. This means we don’t have to search for Cross-Site Scripting (XSS) or Cross-Site Request Forgery (CSRF) vulnerabilities for example.
So what are we looking for then?
Scanning for open ports
As mentioned in the Introduction post, I’ve added an entry in my hosts file for the IP- address of Blocky to the host blocky.htb.
|
Since we only have direct IP access, we need to start with scanning which ports are open on the host.
We can do this with a tool called Nmap, which is installed by default on Kali Linux.
To scan for all open TCP ports (0 - 65535) we can execute the following command: nmap -p- blocky.htb, where -p- means "scan all ports".
If we execute this command, we get the following output:
$ nmap -p- blocky.htb
Starting Nmap 7.80 ( https://nmap.org ) at 2020-06-03 14:16 CEST
Nmap scan report for blocky.htb (10.10.10.37)
Host is up (0.019s latency).
Not shown: 65530 filtered ports
PORT      STATE  SERVICE
21/tcp    open   ftp
22/tcp    open   ssh
80/tcp    open   http
8192/tcp  closed sophos
25565/tcp open   minecraft

Nmap done: 1 IP address (1 host up) scanned in 144.28 seconds
Now we’ve found open ports and one explicitly closed port, we already see the name of the services.
Nmap also has the possibility to scan these services for their software name and version, and do some standard exploration work for us.
For this, we can execute the command nmap -sC -sV -p 21,22,80,8192,25565 blocky.htb, where -sC means execute all scripts in the default category and -sV means probe open ports to determine service/version info.
The output for Blocky is:
$ nmap -sC -sV -p 21,22,80,8192,25565 blocky.htb
Starting Nmap 7.80 ( https://nmap.org ) at 2020-06-03 14:26 CEST
Nmap scan report for blocky.htb (10.10.10.37)
Host is up (0.024s latency).

PORT      STATE  SERVICE   VERSION
21/tcp    open   ftp       ProFTPD 1.3.5a
22/tcp    open   ssh       OpenSSH 7.2p2 Ubuntu 4ubuntu2.2 (Ubuntu Linux; protocol 2.0)
| ssh-hostkey:
|   2048 d6:2b:99:b4:d5:e7:53:ce:2b:fc:b5:d7:9d:79:fb:a2 (RSA)
|   256 5d:7f:38:95:70:c9:be:ac:67:a0:1e:86:e7:97:84:03 (ECDSA)
|_  256 09:d5:c2:04:95:1a:90:ef:87:56:25:97:df:83:70:67 (ED25519)
80/tcp    open   http      Apache httpd 2.4.18 ((Ubuntu))
|_http-generator: WordPress 4.8
|_http-server-header: Apache/2.4.18 (Ubuntu)
|_http-title: BlockyCraft – Under Construction!
8192/tcp  closed sophos
25565/tcp open   minecraft Minecraft 1.11.2 (Protocol: 127, Message: A Minecraft Server, Users: 0/20)
Service Info: OSs: Unix, Linux; CPE: cpe:/o:linux:linux_kernel

Service detection performed. Please report any incorrect results at https://nmap.org/submit/ .
Nmap done: 1 IP address (1 host up) scanned in 8.86 seconds
Neat!
Summarizing
We now know the following:
-
Port 21 (FTP) is open and running ProFTPD 1.3.5a
-
Port 22 (SSH) is open and running OpenSSH 7.2p2
-
We have multiple indicators that the server is running Ubuntu
-
Port 80 (HTTP) is open and running Apache httpd 2.4.18
-
Port 80 is using WordPress 4.8 as CMS and the title of the page is "BlockyCraft - Under Construction!"
-
Port 8192 (sophpos) is explicitly blocked. After a quick Google, Sophos appears to be some kind of endpoint security control.
-
Port 25565 (Minecraft) is open and running Minecraft 1.11.2, without any users joined
To determine service/version info, Nmap will simply create a connection to the port and checks how the service responds. This is called Banner Grabbing. You can try this yourself, by using for example Netcat or the Telnet client (syntax for this purpose is the same for both):
$ nc blocky.htb 21
220 ProFTPD 1.3.5a Server (Debian) [::ffff:10.10.10.37]
Here we also see the same output for port 21 (FTP) as Nmap told us.
We know what ports we can explore currently. Let’s see what we can find on these ports!
Exploring open ports
Port 21: FTP
Let’s start with the first port: FTP.
Within FTP it is possible to have an anonymous account, which basically is a guest user.
To try this, simply login with both user and password anonymous with an FTP client:
$ ftp blocky.htb
Connected to blocky.htb.
220 ProFTPD 1.3.5a Server (Debian) [::ffff:10.10.10.37]
Name (blocky.htb:niels): anonymous
331 Password required for anonymous
Password:
530 Login incorrect.
Login failed.
Remote system type is UNIX.
Using binary mode to transfer files.
Unfortunately the anonymous account seems to be disabled for this box. Let’s go to the next port: HTTP.
Port 80: HTTP
The easiest way to browse HTTP is simply with your browser. We’re greeted with the page as shown in figure 1.


If we look closely at the text, we can see that they’re developing a Wiki system and core plugin to track player stats. Let’s keep this in the back of our mind, because we might be able to extract some information from these if we can obtain them.
Wiki
What we can do is appending /wiki to our path to try our luck and try to be able to see the Wiki system they’re working on.
This leads us to a page that actually exists and contains the text:
Please check back later! We will start publishing wiki articles after we have finished the main server plugin!
The new core plugin will store your playtime and other information in our database, so you can see your own stats!
The text refers to a database. If we would be able to obtain the plugin, we might find the credentials for the database.
Plugins
Let’s try our luck again, and go to /plugins (because where else would you store your plugins? ;-)).
Again we’re in luck.
We’re presented with a page where we can see two files:
-
BlockyCore.jar
-
griefprevention-1.11.2-3.1.1.298.jar
The former sounds like our plugin!
Since we at JDriven are specialized in Java, we know that a JAR file is simply a Zipped folder with compiled .class files and optionally some resource files like configuration files.
This means we can simply extract our file using the unzip command: unzip BlockyCore.jar.
The contents of the JAR file are:
.
├── com
│    └── myfirstplugin
│        └── BlockyCore.class
└── META-INF
    └── MANIFEST.MF
To investigate the class file we can do two things:
-
Try to decompile the file to see the code structure and perhaps find credentials
-
Output the file to our console and see if we can read something interesting
For sake of simplicity let’s try option 2 first (I’ve left out unreadable characters):
$ cat com/myfirstplugin/BlockyCore.class
(...)-com/myfirstplugin/BlockyCorejava/lang/ObjectsqlHostLjava/lang/String;sqlUsersqlPass<init>()VCode


        localhost
                       root
                               8YsqfCTnvxAUeduzjNSXe22
onServerStart                                          LineNumberTableLocalVariableTablethisLcom/myfirstplugin/BlockyCore;
             onServerStop
                         onPlayerJoi"TODO get usernam$!Welcome to the BlockyCraft!!!!!!!
&
 '(
   sendMessage'(Ljava/lang/String;Ljava/lang/String;)usernamemessage
SourceFileBlockyCore.java!
(...)
Looking at the output, it seems there is an account for root on localhost (the machine itself) in the compiled class.
The password is 8YsqfCTnvxAUeduzjNSXe22.
Let’s write down these credentials and continue our exploration.
RSS
On the home page itself, we saw several links.
After trying them all, I found something interesting in the RSS feed link.
The RSS feed contains the name of the creator of the post, which is Notch.
Let’s write that down as well.
phpMyAdmin
Sometimes when there’s a MySQL database installed, phpMyAdmin is installed as well to easily manage the database.
This software can be deployed on the same Apache httpd server and is most commonly under /phpmyadmin.
After going to that page, we’re presented with the login page of phpMyAdmin.
Since we already found the root credentials in the plugin, we can try these out.
And we’re in!
We can immediately check the table wordpress.wp_users to check if we can find more credentials, as seen in figure 2.
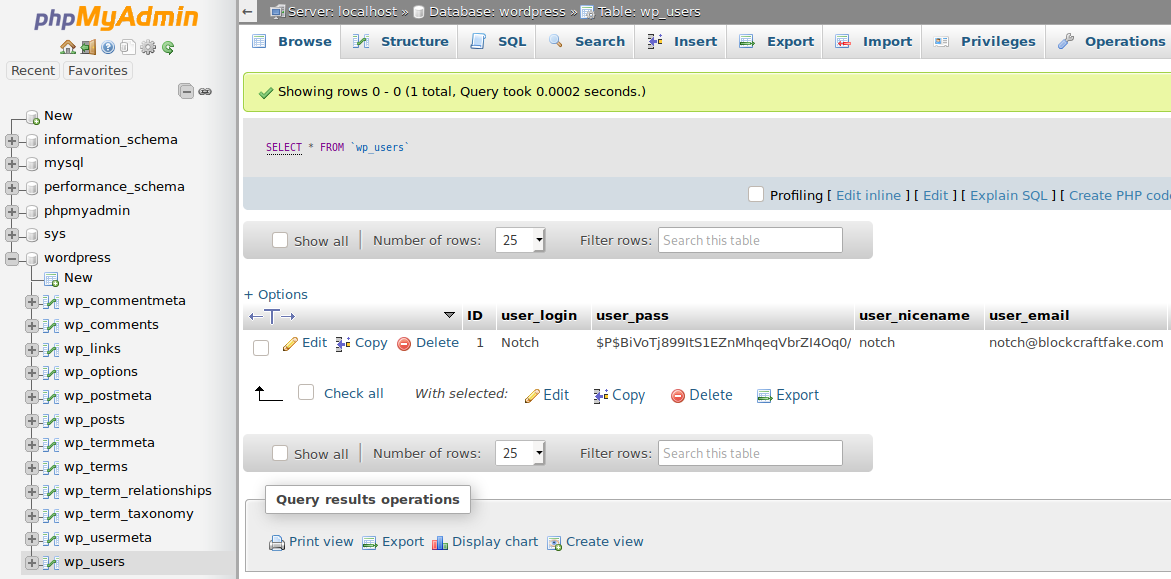
We can see the creator Notch being present, together with his hashed password.
There are several approaches we could take in the next step to gain admin rights in Wordpress:
-
Try to crack the password
-
Change the password ourselves
-
Add a new user with admin rights
But for now, let’s just continue our exploration and write down the hash and the fact that we have root rights for MySQL.
Busting dirs
So by now we’ve done a few educated guesses to gather quite some information. We can also use a tool which tries to find more directories/files by using a wordlist. Several tools exist, but I’ll use one called GoBuster. An example command for Blocky looks like this:
gobuster dir --extensions php,txt --wordlist /usr/share/wordlists/dirbuster/directory-list-2.3-medium.txt --url http://blocky.htbLet’s break down this command:
-
--extensions php,txt: search for .php and .txt files, in addition to finding directories -
--wordlist …: set the wordlist which is used for the scan. The wordlist I’m using is present by default on Kali Linux -
--url http://blocky.htb, sets our target
If we run this command, we get the following output:
$ gobuster dir --extensions php,txt --wordlist /usr/share/wordlists/dirbuster/directory-list-2.3-medium.txt --url http://blocky.htb
===============================================================
Gobuster v3.0.1
by OJ Reeves (@TheColonial) & Christian Mehlmauer (@_FireFart_)
===============================================================
[+] Url:            http://blocky.htb
[+] Threads:        10
[+] Wordlist:       /usr/share/wordlists/dirbuster/directory-list-2.3-medium.txt
[+] Status codes:   200,204,301,302,307,401,403
[+] User Agent:     gobuster/3.0.1
[+] Extensions:     php,txt
[+] Timeout:        10s
===============================================================
2020/06/03 19:46:07 Starting gobuster
===============================================================
/index.php (Status: 301)
/wiki (Status: 301)
/wp-content (Status: 301)
/wp-login.php (Status: 200)
/plugins (Status: 301)
/license.txt (Status: 200)
/wp-includes (Status: 301)
/javascript (Status: 301)
/wp-trackback.php (Status: 200)
/wp-admin (Status: 301)
/phpmyadmin (Status: 301)
/wp-signup.php (Status: 302)
Nothing much of interest after visiting the pages.
We now have quite a lot of information. There’s one thing we still need to do though, before trying to move to the next step. We know which software and which versions that run on the machine. What we can do with that information is searching for vulnerabilities.
Searching for vulnerabilities
There are several ways we can use to search for vulnerabilities, but simply Googling the name and version of the software in combination with "exploit" will often do the trick.
| A vulnerability is a security weakness in the system. If this vulnerability is found, people will try to abuse this vulnerability. Abusing this vulnerability is called an exploiting. Most commonly this is done with a script, which is called an exploit. |
Let’s start with the first port: ProFTPd 1.3.5a. A quick search leads to an exploit from Exploit-DB, which is a known database for exploits. It exploits an authorization issue with the copy commands. This could be of use in our next step: Gaining Access. For now, let’s continue our research and take a note of this exploit.
On to the next port: OpenSSH 7.2p2. A quick Google shows there’s a user enumeration vulnerability, which could be of use as well if we get stuck.
Searching for Apache 2.4.18 leads to for example an OPTIONS memory leak, called Optionsbleed. What’s important to keep in mind, is that this box has been released on July 21st 2017. Sometimes there are additional ways into the box because new vulnerabilities were discovered after the release of the box. These are unintended ways in, which we should try to refrain from using as this might teach us less than the intended way. Looking at the report date of the Optionsbleed bug, we can see this is later than the initial release date of the box. So let’s ignore this vulnerability.
We’ll do a quick search on Wordpress 4.8 as well. This one contains a lot of vulnerabilities actually, see this result in CVE Details. However, all vulnerabilities were published after the release date of the box, so let’s ignore them.
Last, but not least, let’s search for vulnerabilities in Minecraft 1.11.2. After a quick Google, there’s nothing much of interest here.
Moving on
With all the information we’ve collected, I think we have found several ways which we can try to get in. This however, is for the next blog :-).
