A Developers Toolbox: part 2
In my previous post I showed you my terminal and shell, with some of the configuration I like to use. This post of 'A Developers Toolbox' will be all about git and vim. I will show you the aliases I use, how you can set up git hooks, and a useful tool to view your git log. And I will share my vim configuration, with some tips and tricks on how to use it.
git aliases
As git is one of the most used tools for me, I have created a few useful aliases for git.
It simply shortens what I have to type every time.
And some of these are actually useful, such as my git ifuckedup alias, when you just want to reset everything as if you do a new clone.
git config --global alias.st status

git config --global alias.ci commit
# Or alternatively you could do this if you prefer to write your commit message right away:
git config --global alias.ci "commit -m"
# You then use it like this: git ci "my commit msg"

git config --global alias.co checkout
git config --global alias.br branch
git config --global alias.ps push
git config --global alias.pl pull
git config --global alias.fp "push --force-with-lease"
git config --global alias.ft "fetch --prune"
git config --global alias.rb "rebase -i"
git config --global alias.nb "checkout -b"

# Resets your current branch to be equal to the version that is on the server (origin)
git config --global alias.ifuckedup "!git reset --hard origin; git clean -fd"

# Cleans up local branches that have been merged
git config --global alias.cleanlocal "!git branch --merged master | grep -v master | xargs -n 1 git branch -d"

# Does a normal pull and also does a 'pull' for all git submodules.
git config --global alias.pullallthethings "!git pull && git submodule update --init --recursive"
git hooks
Git has a lot of useful hooks that you can use to run custom scripts.
For example, you could use the pre-push hook to validate certain things before actually pushing.
Or in my case, you can create a pre-push hook to play a part of the song Salt 'n Pepa - Push it before pushing.
To create a hook, simply add the file pre-push to the .git/hooks directory of your project.
The contents of the file can be anything you want, a simple example:
#!/bin/sh
echo This is the pre-push hook
As you can see this allows you to run any command or script you want for that hook, just don’t forget to make it executable with chmod +x.
If you want to use a hook for all your projects, you can use git templates.
Create a directory, for example ~/.git-templates/hooks/ and place your scripts in there.
And set up git to use your template directory: git config --global init.templatedir '~/.git-templates'.
Now everytime you clone a new project it will use the files in the template directory, so your hook is automatically configured.
If you already have an existing project, simply run git init, it will then copy the templates as well.
tig
Using git log is usually a pain in the ass, especially if you want it to look a certain way.
Instead of that, I tend to use the tool tig. It’s an interactive text based interface for git log.
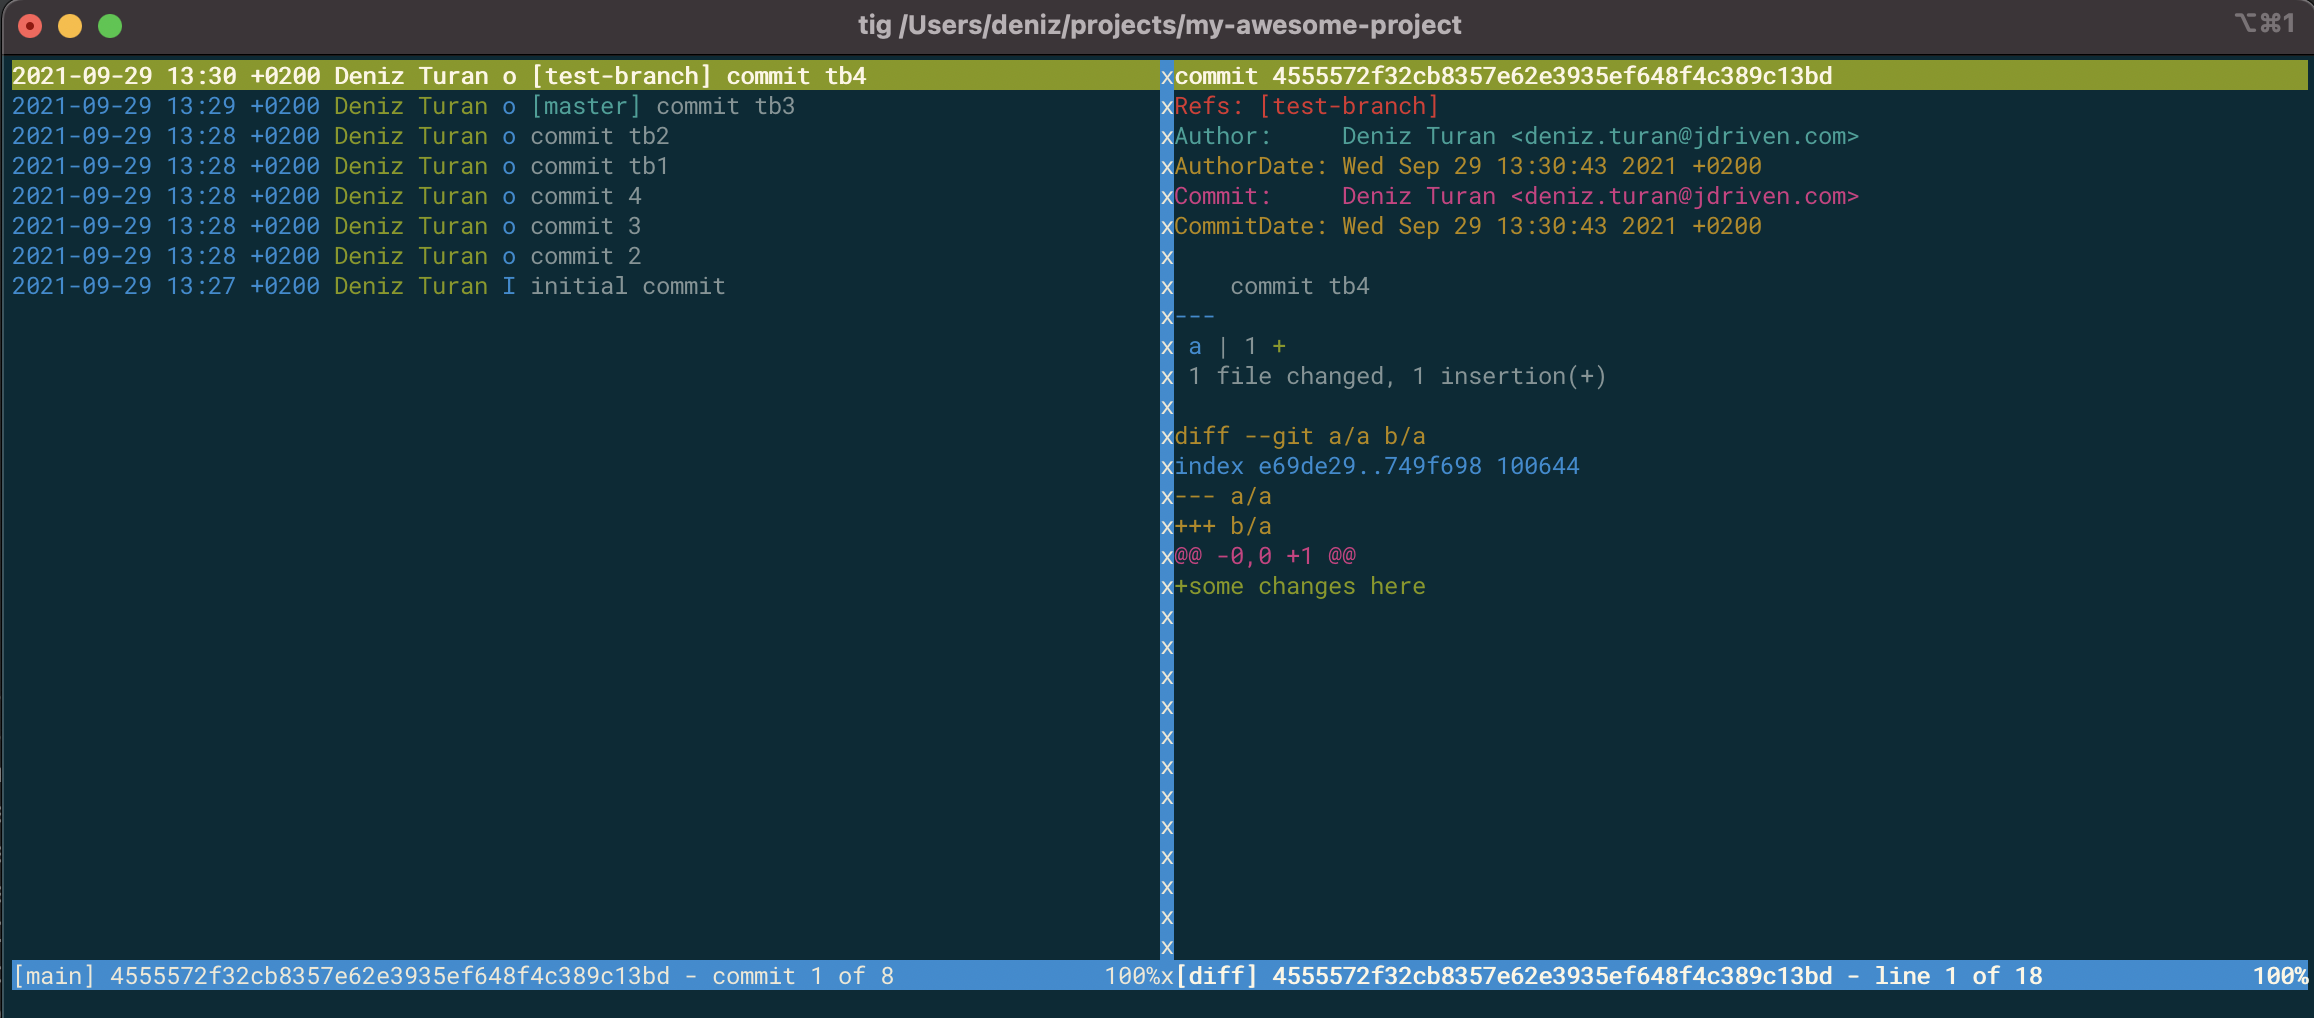
It shows the commits, and when you press Enter on a commit, you can see the changes in that commit.
In this case the text some changes here was added to the file a.
vim
Vim can be a very powerful tool once you get a hang of the basics. You don’t need to know every shortcut to make it useful, I certainly wouldn’t call myself a vim expert. I normally don’t use it for development, but if I need to do a small change I tend to use vim instead of starting IntelliJ for example. Or of course when I need to write a commit message when using git.
The best way to learn vim, is just simply start using it. The website vim wiki has a lot of tips and tricks, you usually end up on this website when you search how to do a certain thing in vim. Although vim might seem overwhelming at first, it works pretty well if you give it a chance.
To make vim more useful, I have some plugins installed.
To install plugins, you need a plugin manager for vim.
I use vim-plug.
To install a plugin, you first add it to your ~/.vimrc file, and then run the command :PlugInstall in vim.
To search for plugins see the vimawesome website, there are probably many more useful plugins that I don’t use yet.
Here is how my vim looks like:
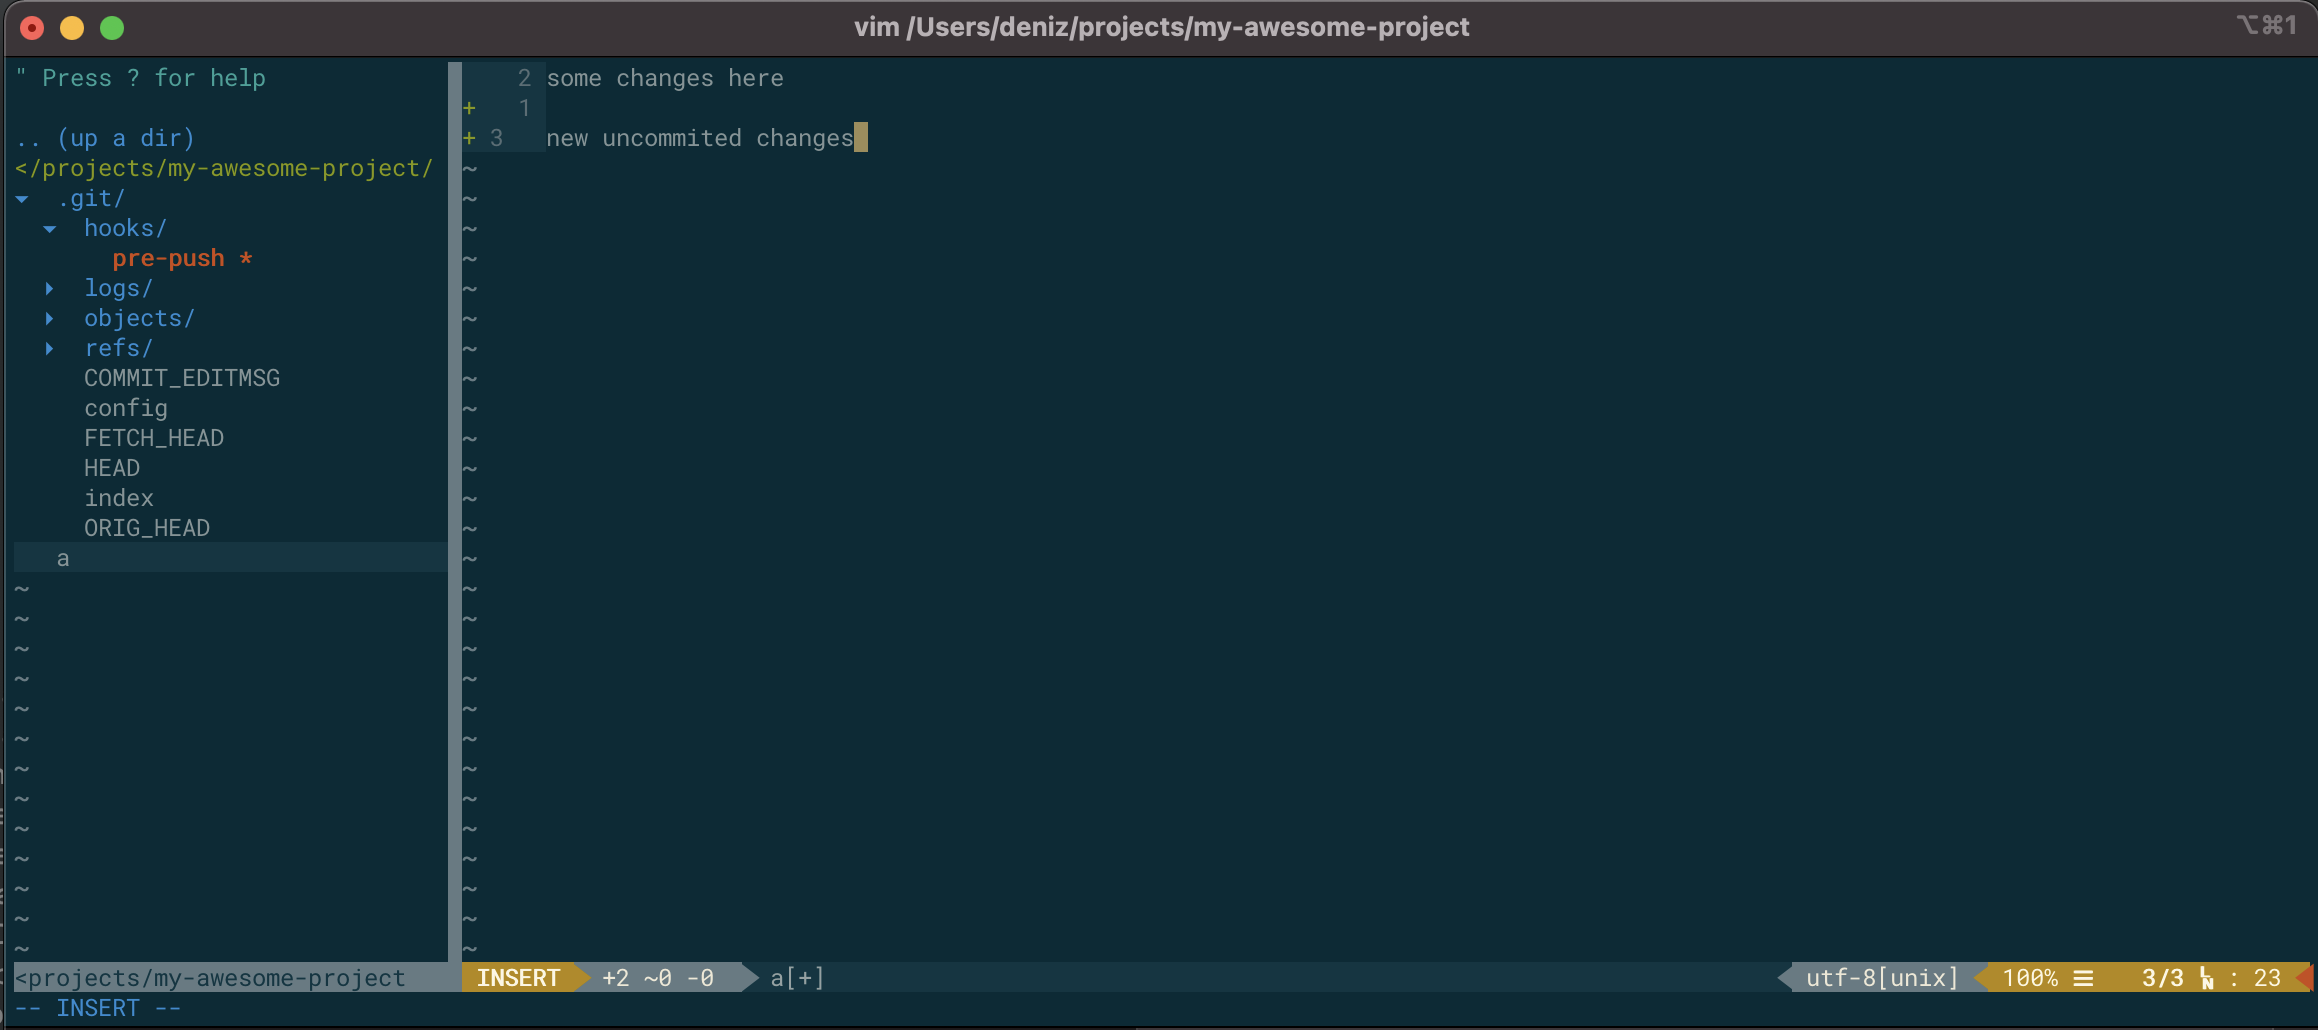
To the left, you can see the file-tree, which is the plugin nerd-tree.
I have configured it to show/hide the file-tree using the shortcut control-shift-n.
On the right you can see that I am editing the file a.
The line numbers that are shown might be a bit weird: the current line that is selected is line 3, there it shows the correct number.
The other line numbers are relative to the current line, so it’s 1 or 2 lines up.
This is useful because you can go one line up using k, but you can do 2k to go two lines up.
This way you can immediately see how many lines you have to go up or down to go to the line you want.
Next to the line numbers you can see a green `, which is the git diff basically.
It will show a yellow `~` if the line is modified, and the green ` is for newly added lines.
Here is my ~/.vimrc file:
call plug#begin('~/.vim/plugged')

Plug 'scrooloose/nerdtree'
Plug 'altercation/vim-colors-solarized'
Plug 'vim-airline/vim-airline'
Plug 'vim-airline/vim-airline-themes'
Plug 'ctrlpvim/ctrlp.vim'
Plug 'tpope/vim-surround'
Plug 'airblade/vim-gitgutter'
Plug 'kshenoy/vim-signature'
Plug 'junegunn/vim-easy-align'
Plug 'chrisbra/csv.vim'

call plug#end()

"airline settings
let g:airline_powerline_fonts = 1
let g:airline_theme='solarized'

"spaces/tabs
:set tabstop=2 shiftwidth=2 expandtab

"yank to clipboard
:set clipboard=unnamed
"for linux you might need :set clipboard=unnamedplus

"nerdtree
autocmd StdinReadPre * let s:std_in=1
autocmd VimEnter * if argc() == 0 && !exists("s:std_in") | NERDTree | endif
autocmd bufenter * if (winnr("$") == 1 && exists("b:NERDTree") && b:NERDTree.isTabTree()) | q | endif
map <C-n> :NERDTreeToggle<CR>
let NERDTreeShowHidden=1

"solarized
syntax enable
set background=dark
colorscheme solarized
hi SignColumn guibg=NONE
hi SignColumn ctermbg=NONE
hi SignatureMarkText ctermbg=NONE

"line numbers
:set number
:set relativenumber

"highlight search
:set hlsearch
:set incsearch
:set ignorecase
:set smartcase

" Start interactive EasyAlign in visual mode (e.g. vipga)
xmap ga <Plug>(EasyAlign)

" Start interactive EasyAlign for a motion/text object (e.g. gaip)
nmap ga <Plug>(EasyAlign)

" Maintain undo history between sessions
set undofile
set undodir=~/.vim/undodir
At the top you can see the plugins that are/should be installed. Below the plugins there are a lot of settings to customize everything. All the other settings are grouped, with an explanation above them.
The top four plugins are visual plugins, the file-tree and theme related plugins.
Git gutter show the git status per line, as explained before.
Vim surround allows you to easily change 'Hello' to "Hello", so changing the 'surroundings' of some text (also works with html tags).
Vim signature shows marks that you place in the file, so you can easily see where the marks are.
Marks are like bookmarks, you can quickly go to the 'bookmarked' line.
To place a mark type ma, this will create a mark named a.
To go to the marker a type 'a and it will jump to the line containing the mark.
You can use any lower case letter [a-z] to mark within each file, however you can also have global marks using capital letters [A-Z], which will also switch files!.
The usage for global marks is the same, just write the capital letter instead: mA.
The plugin vim csv is useful when opening csv files, and finally vim align is for aligning multiple lines on the same character. If your file looks like this:
line = some text
linetwo = some text
line three = some text
You can use vim align to make it look like this:
line       = some text
linetwo    = some text
line three = some text
To do that, use shift + V to enter visual line mode, and select the three lines.
Then type ga= to align it on the = character.
