gRPC as an alternative to REST
gRPC is a high-performance RPC framework created by Google. It runs on top of HTTP2 and defaults to the protocol buffers instead of JSON on the wire. As probably most developers, I’ve also been creating microservices for the past several years. These services usually communicate over HTTP with a JSON payload. In this post I want to present gRPC as an alternative to REST when most of your API’s look like remote procedure calls. In my time using REST API’s I have encountered many discussions about status codes (which do not map very well onto your application errors), API versioning, PUT vs PATCH, how to deal with optional fields, when to include things as query parameters etc. This can lead to inconsistent API’s and requires clear documentation.

The bottom line is that there are a lot of choices to make when designing a good REST API and all these choices require documentation. Documentation does not necessarily reflect the truth. This all requires a lot of work and takes the focus away from your actual business problems.
Welcome to gRPC
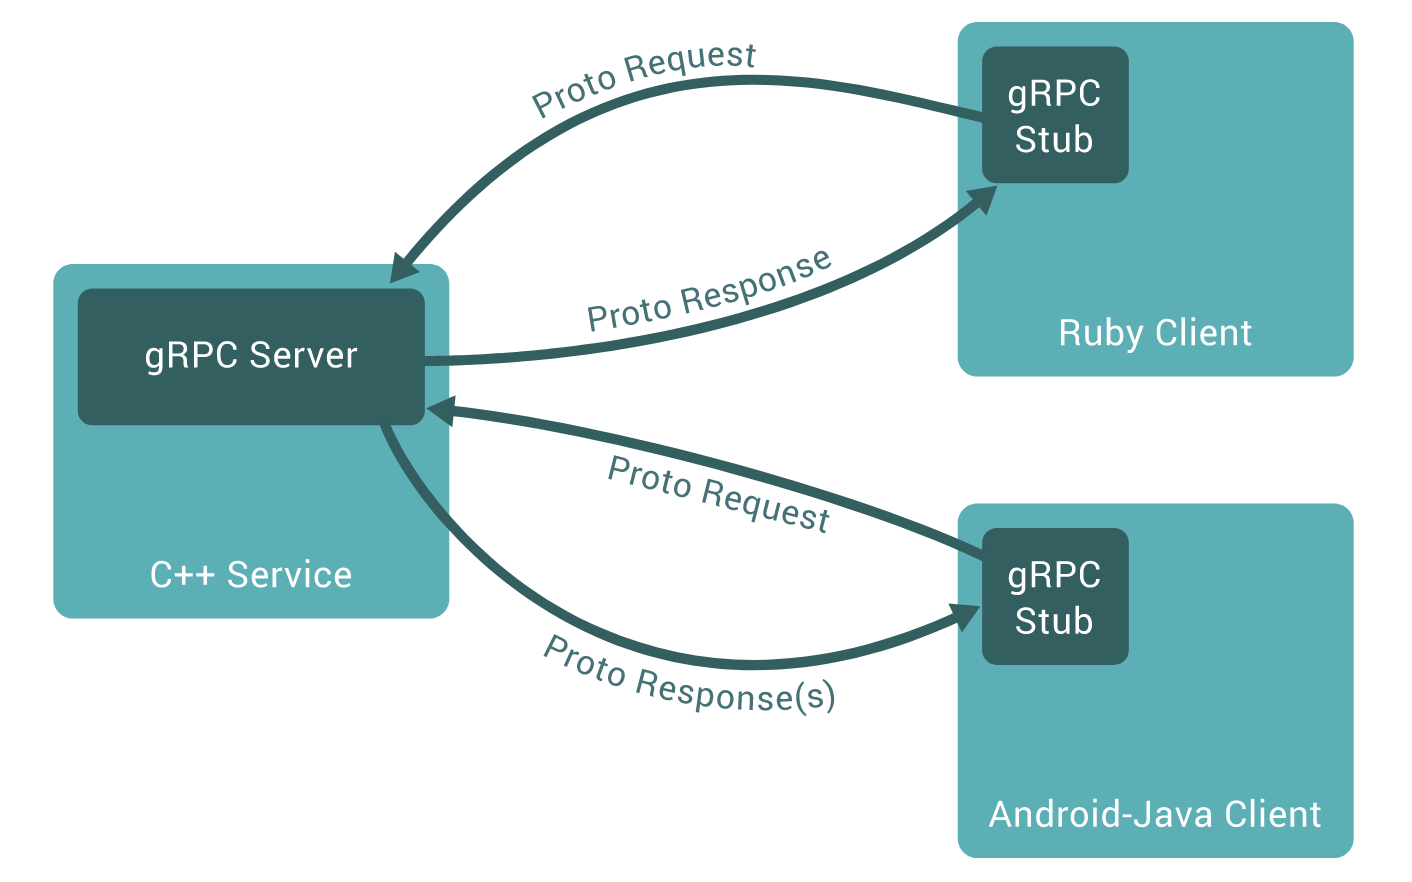
In gRPC, messages and operations are defined in an IDL file (Interface Description Language) which serves as a strong typed interface definition. From this IDL file we can generate type-safe DTO’s and client and server implementations in multiple languages (officially supported: C, C#, Dart, Go, Java (and Kotlin), Node.js, Objective-C, PHP, Python, Ruby). The types are serialized in the binary protocol buffers wire format when calling remote procedures. A server generated in C can transparently communicate with a client written in, for example, java. The image below gives a conceptual overview:
Defining messages
Let’s write a product review service in gRPC. We can start by defining the request and response body of a review in a product\_service.proto file:
message ProductReviewRequest {
    string productId = 1;
    string reviewerEmail = 2;
    int32 fiveStarRating = 3;
    string review = 4;
}
enum Result {
    OK = 0;
    FAILED_BAD_LANGUAGE = 1;
    FAILED_INVALID_SCORE = 2;
    FAILED_UNKNOWN = 3;
}
message ProductReviewResponse {
    Result status = 1;
}
I think this definition speaks for itself for the most part except for the numbers at the end of each field. They identify the field in the binary representation of the message and should not change after your message is used in production. The protobuf compiler can take a message definition and generate a class with getters and setters and a builder. The protobuf compiler usually runs as part of your build. A ProductReviewRequest can then easily be created as follows:
      ProductReviewRequest myReview = ProductReviewRequest.newBuilder()
               .setReview("Awesome product!")
               .setProductId("EAN132069854")
               .setReviewerEmail("chef-special@jdriven.com")
               .setFiveStarRating(5)
               .build();
Defining operations
Having defined the request and response, it’s now time to add an operation to the .proto file as well. The operation name should reflect that if a review already exists, it should be overwritten.
service Product {
   rpc CreateOrUpdateReview (ProductReviewRequest) returns (ProductReviewResponse) {}
}
The client and server will be automatically generated during the build. The client can be used as follows:
ManagedChannel channel = ManagedChannelBuilder
           .forAddress("localhost", 53000)
           .usePlaintext() // TLS is the default, disable for now
           .build();

ProductBlockingStub client = ProductGrpc.newBlockingStub(channel);

ProductReviewResponse result = client.createOrUpdateReview(review);
The server needs to respond to the request with custom logic; this can be done by extending the stub that is automatically generated for you:
class ProductService extends ProductGrpc.ProductImplBase {
   @Override
   public void createOrUpdateReview(
                      ProductReviewRequest request,
                      StreamObserver<ProductReviewResponse> responseObserver) {

        ProductReviewResponse resp = ProductReviewResponse.newBuilder()
               .setStatus(Result.OK)
               .build();

        responseObserver.onNext(resp);
        responseObserver.onCompleted();
   }
}
Running the service
public static void main(String[] args) throws IOException, InterruptedException {
       Server service = ServerBuilder.forPort(53000)
               .addService(new ProductService())
               .build()
               .start();
       Runtime.getRuntime().addShutdownHook(new Thread(service::shutdownNow));
       System.out.println("Started listening for rpc calls on 53000...");
       service.awaitTermination();
}
Now we have a complete service with an automatically generated client and server. You can easily add operations and messages by editing the .proto file. All fields in gRPC messages are optional by design. Optional fields that are not set by the client or are missing because the client uses an older compiled interface get their default values (empty string, or 0 for numbers). Therefore, existing interfaces won’t break. See https://github.com/protocolbuffers/protobuf/issues/2497 for more info on the rationale. We can add a lot of functionality such as tracing, security, validation bi-directional streaming, asynchronous calls, and so on, but that’s for another blog post.
Try it yourself
You can easily try this out yourself by cloning this sample project: https://github.com/toefel18/product-service-grpc-blogpost
-
Open the project in your favourite IDE (intellij works out of the box)
-
Run
./gradlewon Linux/Mac, orgradlew.baton Windows to run a build -
Run
ServerMain.java -
Run
ClientMain.java -
Feel free to experiment :)
