Infrastructure Automation on Google Cloud Platform
Infrastructure automation basically is the process of scripting environments — from installing an OS to installing and configuring servers on instances. It also includes configuring how the instances and software communicate with one another, and much more. Automation allows you to redeploy your infrastructure or rebuild it from scratch, because you have a repeatable documented process. It also allows you to scale the same configuration to a single node or to thousands of nodes. In the past years, several open source and commercial tools have emerged to support infrastructure automation. These tools include Ansible, Chef, Terraform and Puppet. They support cloud platforms, but also virtual and physical environments. On Google Cloud Platform you have the possibility to use Cloud Deployment Manager. The Cloud Deployment Manager allows you to automate the configuration and deployment of your Google Cloud with parallel, repeatable deployments and template-driven configurations.
Configuration
A configuration describes all the resources you want for a single deployment. This Configuration is a YAML file that lists each of the resources you want to create and their respective resource properties. Each configuration must contain a resources: section, followed by the list of resources to create. Each resource must contain three components:
- name
-
A user-defined string to identify this resource
- type
-
The type of the resource being deployed, as described and listed in the Supported Resource Types documentation
- properties
-
The parameters for this resource
Templates
A configuration may contain templates. These are essential parts of the configuration file that have been abstracted into individual building blocks. After you create a template, you can reuse it across deployments as necessary. If you find yourself rewriting configurations that share very similar properties, you could abstract the shared parts into templates. Templates are much more flexible than individual configuration files. Templates are files written in either Python or Jinja2. The Deployment Manager will interpret each template recursively and inline the results with the configuration file.
Example
The small example below shows the power of using multiple template files to make your configuration as modular as possible.
First, let’s create a template file containing the compute instance called vm-template.jinja.
Don’t forget to replace [MY_PROJECT] with your project ID.
resources:
- name: the-first-vm
  type: compute.v1.instance
  properties:
    zone: us-central1-f
    machineType: https://www.googleapis.com/compute/v1/projects/[MY_PROJECT]/zones/us-central1-f/machineTypes/f1-micro
    disks:
    - deviceName: boot
      type: PERSISTENT
      boot: true
      autoDelete: true
      initializeParams:
        sourceImage: https://www.googleapis.com/compute/v1/projects/debian-cloud/global/images/family/debian-9
    networkInterfaces:
    - network: $(ref.a-new-network.selfLink)
      accessConfigs:
      - name: External NAT
        type: ONE_TO_ONE_NAT
Network configuration and firewall rules might be shared by different parts of the infrastructure. Therefore we should create separate templates for them. Create a file named network-template.jinja. This file contains the network-specific configuration.
resources:
- name: a-new-network
  type: compute.v1.network
  properties:
    IPv4Range: 10.0.0.1/16
Create a file named firewall-template.jinja. This file contains the firewall-specific configuration.
resources:
- name: a-firewall-rule
  type: compute.v1.firewall
  properties:
    network: $(ref.a-new-network.selfLink)
    sourceRanges: ["0.0.0.0/0"]
    allowed:
    - IPProtocol: TCP
      ports: ["80"]
The next step is to create a template that uses the network, firewall, and virtual machine templates. Name this file compute-engine-template.jinja.
resources:
- name: vm-1
  type: vm-template.jinja
- name: network-1
  type: network-template.jinja
- name: firewall-1
  type: firewall-template.jinja
The last step is to create a configuration that uses the templates created earlier. Create a file named config-with-multiple-templates.yaml and add the following configuration:
imports:
- path: vm-template.jinja
- path: network-template.jinja
- path: firewall-template.jinja
- path: compute-engine-template.jinja

resources:
- name: compute-engine-setup
  type: compute-engine-template.jinja
With the Google Cloud SDK installed on your local machine, deploy your configuration with the following command:
$ gcloud deployment-manager deployments create deployment-with-multiple-templates \
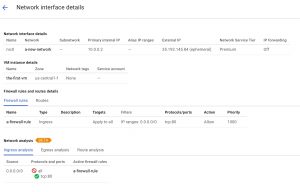
--config config-with-multiple-templates.yamlThe command output shows the result of the deployment. If you login to the GCP console you could see the result as shown below.