A first look at GitHub Codespaces
Join me for my first look into GitHub Codespaces. I’ll walk you through setting up some basic configuration, and some things to keep in mind.
Setting up a codespace
In these examples I will be using Visual Studio Code for the Web.
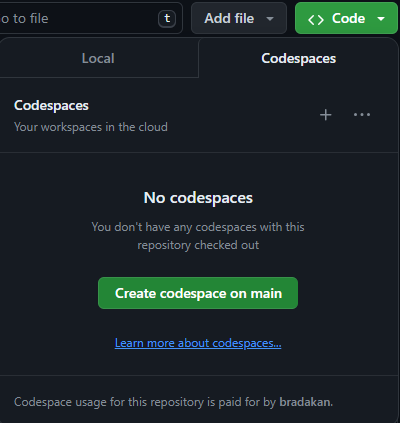
The quickest way to get started with GitHub Codespaces on any repository on GitHub is to go to a repository and click <> code go to the codespaces tab and click create codespace on main.
This uses the default dev containter configuration.
Adding a configuration
If you want to add a configuration to an already existing project, first open the codespace Visual Studio Code for Web.
Open the Visual Studio Code Command Palette from the codespace (Shift+Command+P / Ctrl+Shift+P), then start typing "add dev". Click Codespaces: Add Dev Container Configuration Files.
Click Create a new configuration.
Then you see a list of base templates if you wish to see more definitions you could go with Show all Definitions, for now i’ll be going with Debian.
After you select a template you’ll go to a list of features you could add to the template to add for example Postgres and Java.
You can find the list of features here https://containers.dev/features.
After you can configure some of the options for example you can choose to install maven or gradle alongside Java and the Java version and distributor.
The things you have selected here will end up in the features object in the JSON the devcontainer.json generated in the .devcontainer folder which in turn is generated in the root of the project, it should look something like this.
{
	"name": "Debian",
	"image": "mcr.microsoft.com/devcontainers/base:bullseye",
	"features": {
		"ghcr.io/devcontainers/features/java:1": {
			"installMaven": true,
			"installGroovy": true,
			"version": "17",
			"jdkDistro": "ms",
			"mavenVersion": "latest",
			"antVersion": "latest",
			"groovyVersion": "latest"
		},
		"ghcr.io/itsmechlark/features/postgresql:1": {
			"version": "latest"
		},
		"ghcr.io/robbert229/devcontainer-features/postgresql-client:1": {
			"version": "13"
		}
	}
}
Now every time the devcontainer is started it will use the specified docker image and install the pgsql client to use Postgres.
Verifying the configuration
These changes are going into effect from the next reboot of the codespace.
By running psql -V you can see the changes aren’t in effect yet.
$ psql -V
bash: psql: command not found
So let’s restart our container. In the bottom left you’ll see Codespaces: codespace name if you click that you’ll see rebuild container click that to rebuild the container and use our new settings.
Now you can see the feature is in effect.
$ psql -V
psql (PostgreSQL) 16.2 (Debian 16.2-1.pgdg110+2)
As you can see this is an easy way to configure things for everyone running this repository as a codespace. Making sure everyone is running on the same machine/image with the same configuration without having to edit files on their local machine.
Having multiple configurations
If you want more as one configuration you can add a new folder to the .devcontainer folder and add another devcontainer.json there.
For example if you with to test some functionality is compatible with an older version of Postgres create a new folder in .devcontainer i named mine postgres-previous-version and a new devcontainer.json with your changes there.
My other devcontainter.json file looks like this.
{
"name": "Debian",
"image": "mcr.microsoft.com/devcontainers/base:bullseye",
"features": {
"ghcr.io/devcontainers/features/java:1": {
"installMaven": true,
"installGroovy": true,
"version": "17",
"jdkDistro": "ms",
"mavenVersion": "latest",
"antVersion": "latest",
"groovyVersion": "latest"
},
"ghcr.io/itsmechlark/features/postgresql:1": {
"version": "11"
},
"ghcr.io/robbert229/devcontainer-features/postgresql-client:1": {
"version": "13"
}
}
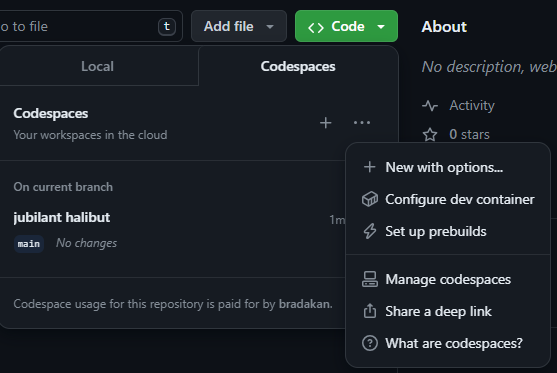
}Then when creating a new codespace click on the three dots next to codespaces and select new with options.
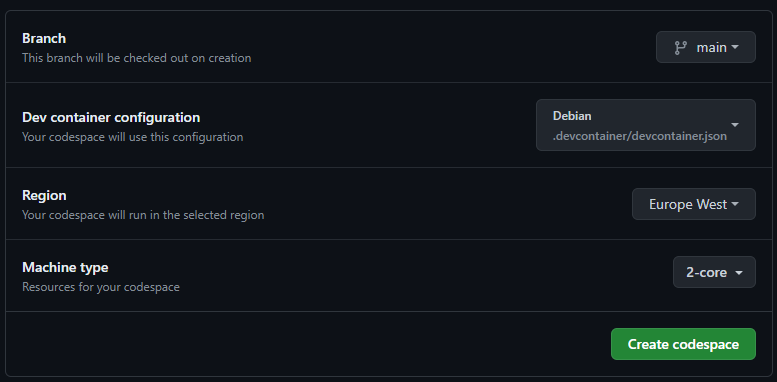
From there you should go to a page which has Dev container configuration which should automatically be on the previously generated one directly in the .devcontainer folder. Select your new configuration from the dropdown and click create codespace.
Now if you run $ psql -V in your newly generated codespace you can see there is an older version of psql installed.
$ psql -V
psql (PostgreSQL) 13.14 (Debian 13.14-1.pgdg110+2)
So now you could have two codespaces running on each configuration to test things between them. And if you make a change in one codespace and push the commit to a branch then in the other you can pull in the changes and quickly test those changes on two configurations.
Codespaces billing, and how to keep costs low
One way to keep costs low it to not leave the codespace idling around, open the Visual Studio Code Command Palette in the web client (Shift+Command+P / Ctrl+Shift+P), then start typing stop codespace. and select stop current codespace to close stop one of the codespaces.
If you don’t do this the codespace would remain active for the idle time before shutting down, costing you precious core hours.
Core hours
But now you’re probably wondering what are core hours? Let me explain. It’s what github uses to bill you, on the page where we selected our second configuration you could also select how many cores your machine will have. A free github account has 120 free core hours but the minimum amount of cores you can select is 2 which would result in 60 hours of codespace you could use on a 2 core machine. If you would leave a machine running to time out by for example just closing the browser tab it would still be running even if you’re not making use of it. The default idle timeout is 30 minutes which on a 2 core machine, which would result in you wasting one core hour on a 2 core machine, and two core hours on a 4 core machine. Given there is a possibility of a 32 core machine that can waste core hours really quick so better to always properly close the codespace.
Changing the machine type
If you want to change the machine type (Shift+Command+P / Ctrl+Shift+P), then start typing change machine type then the machine type options pop up, on my free account i only have 2 and 4 cores available but as mentioned above up to 32 cores are options.
Selecting a new machine type will require a reboot of your codespace to take effect.
Storage costs
Another thing I ran into is that as long as your codespace exists it will also cost storage GBs per month. You have 15 GB of free storage a month which you can quickly use up by not deleting some codespaces. so you can leave one codespace with a total storage of 15 GB up for a month, or one codespace of 30 GB up for half a month. For this reason i recommend you deleting your codespace once you have committed and pushed your changes and you’re done. Since the setup of the codespace is located in the devcontainer.json you’ll have the same machine and installed options the next time you start a codespace from the repository. If for some reason you don’t want to commit and push your changes it is useful to know that if you close a codespace your uncommited changed will remain in the codespace for when you next open it, as long as you don’t delete the codespace. The default timeout that a codespace is automatically is deleted is 30 days which is also the maximum, so please be aware you can’t leave the uncommited changed there indefinitely. If you want to delete your codespace you can find all your codespaces here https://github.com/codespaces where you can click the three dots on the codespace and stop and or delete it from there.
Settings
Settings like the timeout till a codespace is stopped and the timeout a codespace will exist before it gets deleted are found and can be changed here. https://github.com/settings/codespaces
I hope you have enjoyed my small journey towards getting started with a codespace.
