GKE with terraform and helm
Overview
In this tutorial we will deploy a Spring Boot applications to GKE. The application connects to a cloud Postgres database and exposes some REST endpoints. The required infrastructure is created with Terraform and the code is deployed to GKE with Helm. Helm is also deployed by Terraform.
Prerequisites
-
Java 17 installed
-
Maven installed
-
Docker installed
-
gcloud installed
-
A GC project setup with the billing configured
Create the Java application
We will create a very basic spring-boot application that connects to a database and exposes some endpoints. We will need to the web dependency since we want to expose an API and Flyway to create the table required for our database. I used Postgres for this example, but you can you use whichever database you prefer as long as it exists in GC as cloud SQL.
It has an entity
@Entity
@Table(name = "customer")
public class Customer {

    @Id
    @GeneratedValue(strategy = GenerationType.IDENTITY)
    private Long id;
    @Column(name = "first_name", nullable = false)
    private String firstName;

    @Column(name = "last_name", nullable = false)
    private String lastName;
    public Long getId() {
        return id;
    }

    public void setId(Long id) {
        this.id = id;
    }

    public String getFirstName() {
        return firstName;
    }

    public void setFirstName(String firstName) {
        this.firstName = firstName;
    }

    public String getLastName() {
        return lastName;
    }

    public void setLastName(String lastName) {
        this.lastName = lastName;
    }
}
A repository
@Repository
public interface CustomerRepository extends JpaRepository<Customer, Long> {
}
And a controller
@RestController
public class HelloController {

    @Autowired
    private CustomerRepository customerRepository;

    @GetMapping("hello")
    public String helloWorld() {
        return "Hello World!";
    }

    @PostMapping("write")
    public ResponseEntity<Object> createCustomer(@RequestParam String firstName, @RequestParam String lastName) {
        Customer customer = new Customer();
        customer.setFirstName(firstName);
        customer.setLastName(lastName);
        customerRepository.save(customer);
        return ResponseEntity.status(HttpStatus.CREATED).build();
    }

    @GetMapping("read")
    public Customer readCustomer(@RequestParam Long id) {
        return customerRepository.findById(id).get();
    }
}
The depencies that are required for the project
<?xml version="1.0" encoding="UTF-8"?>
<project xmlns="http://maven.apache.org/POM/4.0.0" xmlns:xsi="http://www.w3.org/2001/XMLSchema-instance"
	xsi:schemaLocation="http://maven.apache.org/POM/4.0.0 https://maven.apache.org/xsd/maven-4.0.0.xsd">
	<modelVersion>4.0.0</modelVersion>
	<parent>
		<groupId>org.springframework.boot</groupId>
		<artifactId>spring-boot-starter-parent</artifactId>
		<version>3.1.3</version>
		<relativePath/> <!-- lookup parent from repository -->
	</parent>
	<groupId>com.hello</groupId>
	<artifactId>world</artifactId>
	<version>0.0.1-SNAPSHOT</version>
	<name>world</name>
	<description>Demo project for Spring Boot</description>
	<properties>
		<java.version>17</java.version>
	</properties>
	<dependencies>
		<dependency>
			<groupId>org.springframework.boot</groupId>
			<artifactId>spring-boot-starter</artifactId>
		</dependency>
		<dependency>
			<groupId>org.springframework.boot</groupId>
			<artifactId>spring-boot-starter-web</artifactId>
		</dependency>
		<dependency>
			<groupId>org.springframework.boot</groupId>
			<artifactId>spring-boot-starter-data-jpa</artifactId>
		</dependency>
		<dependency>
			<groupId>org.postgresql</groupId>
			<artifactId>postgresql</artifactId>
		</dependency>
		<dependency>
			<groupId>org.springframework.data</groupId>
			<artifactId>spring-data-jpa</artifactId>
		</dependency>
		<dependency>
			<groupId>org.flywaydb</groupId>
			<artifactId>flyway-core</artifactId>
		</dependency>
        <dependency>
            <groupId>com.google.cloud.sql</groupId>
            <artifactId>postgres-socket-factory</artifactId>
            <version>1.14.1</version>
        </dependency>
	</dependencies>

	<build>
		<plugins>
			<plugin>
				<groupId>org.springframework.boot</groupId>
				<artifactId>spring-boot-maven-plugin</artifactId>
			</plugin>
			<plugin>
				<groupId>org.flywaydb</groupId>
				<artifactId>flyway-maven-plugin</artifactId>
			</plugin>
		</plugins>
	</build>

</project>
Additionally, we use Flyway, so we need a migration to create the table in the database, add the following file in: src/main/resources/db/migration
CREATE TABLE IF NOT EXISTS customer (
   id serial PRIMARY KEY,
   first_name VARCHAR ( 50 ) NOT NULL,
   last_name VARCHAR ( 50 ) NOT NULL
);
Finally, we need a Docker image of our application in the root of the project
FROM openjdk:17-alpine
VOLUME /tmp
COPY "target/<replace with your artifact name>.jar" app.jar
ENTRYPOINT ["java","-jar","/app.jar"]
Keep in mind that we cannot run this application locally, if you want to do so you will need to setup your local database and properties or create a docker-compose with a database to run it with docker.
Connect you CLI to your google cloud project
In your terminal run the following commands to authorize and connect to your project
gcloud auth application-default login
gcloud config set project <project-id>
You can find your project id in the google cloud console, by clicking in the resource selection at the top left of the screen, next to each project there is the equivalent id.
Set up artifact registry and push docker image
First we will enable the artifact registry API
gcloud services enable artifactregistry.googleapis.comNow we will create a repository in the artifact registry
gcloud artifacts repositories create blogtober-repo \
--repository-format=docker \
--location=europe-west4 \
--immutable-tags \
--async
To push a docker image in the artifact registry the image name must follow this pattern
LOCATION-docker.pkg.dev/PROJECT-ID/REPOSITORY/IMAGE
So in the Java project root we will first build the project
mvn packageAnd now build the docker image, replace the project-id, with your google cloud project id
docker build -t europe-west4-docker.pkg.dev/<project-id>/blogtober-repo/blogtober-image .
docker push europe-west4-docker.pkg.dev/<project-id>/blogtober-repo/blogtober-image
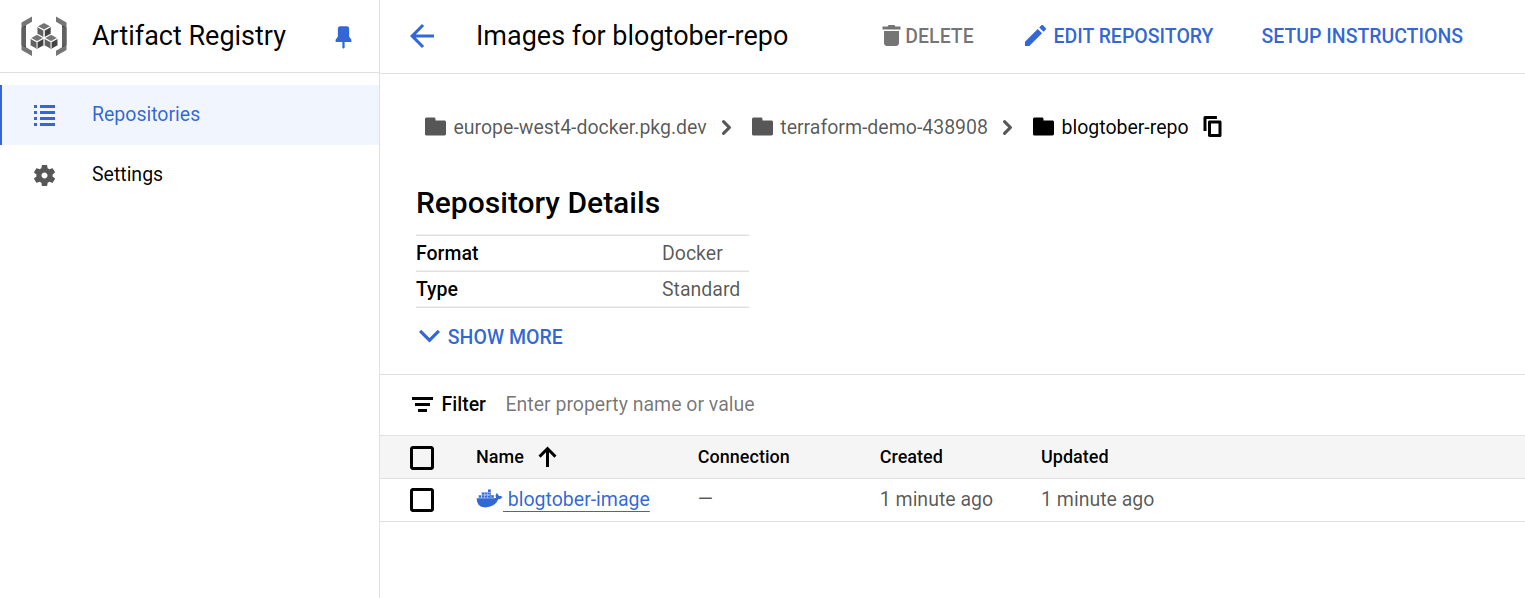
Now if you navigate to the repository in the console you should see the docker image

Terraform
Terraform project consists with a folder containing at least one file with the .tf suffix
Create a folder and add a file named main.tf with the following content.
At line 43 replace <project-id> with the name of your GC project.
terraform {
  required_providers {
    helm = {
      source = "hashicorp/helm"
    }
    google = {
      source = "hashicorp/google"
    }
    kubernetes = {
      source = "hashicorp/kubernetes"
    }
  }
}

provider "google" {
  project = var.project
  region  = "europe-west4"
}

provider "helm" {
  kubernetes {
    host  = google_container_cluster.primary.endpoint
    token = data.google_client_config.provider.access_token
    client_certificate = base64decode(google_container_cluster.primary.master_auth.0.client_certificate)
    client_key = base64decode(google_container_cluster.primary.master_auth.0.client_key)
    cluster_ca_certificate = base64decode(google_container_cluster.primary.master_auth.0.cluster_ca_certificate)
  }
}


variable "api_names" {
  type = list(string)
  default = [
    "compute.googleapis.com", //VPC
    "container.googleapis.com", //GKE
    "servicenetworking.googleapis.com" // servicenetworking needed for db connection
  ]
}

variable "project" {
  default = "terraform-demo-438908"
}

variable "artifact_repository" {
  default = "blogtober-repo"
}

variable "image_name" {
  default = "blogtober-image"
}

variable "image_version" {
  default = "latest"
}

variable "region" {
  default = "europe-west4"
}

resource "google_project_service" "enabled_apis" {
  project = var.project

  for_each = toset(var.api_names)

  service = each.key
}

# Main VPC
resource "google_compute_network" "project_vpc" {
  depends_on = [google_project_service.enabled_apis]
  name                    = "blogktober-vpc"
  auto_create_subnetworks = false
}

resource "google_compute_global_address" "private_ip_address" {
  name          = "private-ip-address"
  purpose       = "VPC_PEERING"
  address_type  = "INTERNAL"
  prefix_length = 16
  network       = google_compute_network.project_vpc.id
}
# Public Subnet
resource "google_compute_subnetwork" "public" {
  name          = "public"
  ip_cidr_range = "10.0.0.0/24"
  region        = "europe-west4"
  network       = google_compute_network.project_vpc.id
}

# Private Subnet
resource "google_compute_subnetwork" "private" {
  name          = "private"
  ip_cidr_range = "10.0.1.0/24"
  region        = "europe-west4"
  network       = google_compute_network.project_vpc.id
}


data "google_client_config" "provider" {}

# GKE cluster
resource "google_container_cluster" "primary" {
  depends_on = [google_project_service.enabled_apis]

  name     = "my-cluster"
  project  = var.project
  location = var.region

  # We can't create a cluster with no node pool defined, but we want to only use
  # separately managed node pools. So we create the smallest possible default
  # node pool and immediately delete it.
  remove_default_node_pool = true
  initial_node_count       = 1

  network         = google_compute_network.project_vpc.id
  subnetwork      = google_compute_subnetwork.public.id
  networking_mode = "VPC_NATIVE"
  ip_allocation_policy {}

  deletion_protection = false
}

# Separately Managed Node Pool
resource "google_container_node_pool" "primary_nodes" {
  project    = var.project
  name       = "${google_container_cluster.primary.name}-node-pool"
  location   = var.region
  cluster    = google_container_cluster.primary.name
  node_count = 1


  node_config {
    oauth_scopes = [
      "https://www.googleapis.com/auth/logging.write",
      "https://www.googleapis.com/auth/monitoring",
      "https://www.googleapis.com/auth/devstorage.read_only",
      "https://www.googleapis.com/auth/service.management.readonly",
      "https://www.googleapis.com/auth/servicecontrol",
      "https://www.googleapis.com/auth/trace.append"
    ]

    labels = {
      env = var.project
    }

    preemptible  = true
    machine_type = "e2-small"
    tags = ["gke-node"]
    metadata = {
      disable-legacy-endpoints = "true"
    }
  }
}


// Online database
resource "google_service_networking_connection" "default" {
  depends_on = [google_project_service.enabled_apis]

  network = google_compute_network.project_vpc.id
  service = "servicenetworking.googleapis.com"
  reserved_peering_ranges = [google_compute_global_address.private_ip_address.name]
}

resource "google_sql_database_instance" "instance" {
  name             = "blogtober-db"
  region           = "europe-west4"
  database_version = "POSTGRES_15"

  depends_on = [google_service_networking_connection.default]

  settings {
    tier = "db-f1-micro"
    ip_configuration {
      ipv4_enabled                                  = "false"
      private_network                               = google_compute_network.project_vpc.id
      enable_private_path_for_google_cloud_services = true
    }
  }
  # set `deletion_protection` to true, will ensure that one cannot accidentally delete this instance by
  # use of Terraform whereas `deletion_protection_enabled` flag protects this instance at the GCP level.
  deletion_protection = false
}

resource "google_sql_database" "database" {
  name     = "blogtober"
  instance = google_sql_database_instance.instance.name
}

resource "google_compute_network_peering_routes_config" "peering_routes" {
  peering              = google_service_networking_connection.default.peering
  network              = google_compute_network.project_vpc.name
  import_custom_routes = true
  export_custom_routes = true
}

resource "google_sql_user" "db_user" {
  name     = "demo_user"
  instance = google_sql_database_instance.instance.name
  password = "demo_password"
}

# Helm
resource "helm_release" "release" {
  depends_on = [google_container_node_pool.primary_nodes, google_sql_database_instance.instance]
  chart            = "helm-chart"
  name             = "helm-chart"
  namespace        = "blogtober-namespace"
  create_namespace = true
  values = [
    templatefile("helm-chart/values.yaml",
      {
        db_ip          = google_sql_database_instance.instance.first_ip_address,
        db_name        = google_sql_database.database.name,
        db_username    = google_sql_user.db_user.name,
        db_password    = google_sql_user.db_user.password,
        app_version    = "latest"
        namespace_name = "blogtober-namespace"
        app_version    = "latest"
        gcp_project    = var.project
        gcp_region     = var.region
        image_name     = var.image_name
        image_version  = var.image_version
        artifact_repository  = var.artifact_repository
      })
  ]
}
This terraform file will create the following * VPC network for our project * Cloud PostgreSQL Database * GKE cluster * Helm Deployment that we will create in the next step
Helm setup
We need to create a Helm chart, in the same directory run
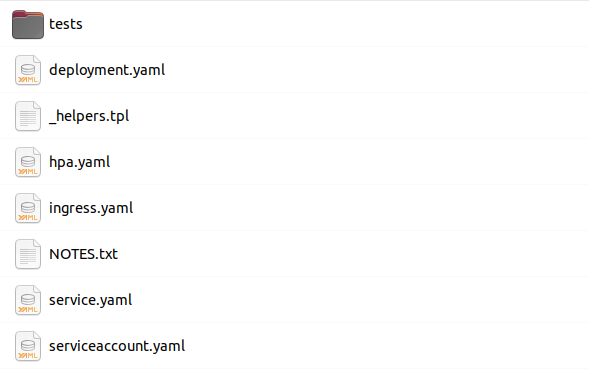
helm create helm-chartThis will create a folder with the helm chart if you use a different name, you will need to update the terraform file with the correct values (lines 212, 213, 217). Navigate in the generated directory, in the template folder you will see something like this

Delete everything except for the helpers.tpl file. And add the following files yaml files in this folder.
apiVersion: v1
kind: ConfigMap
metadata:
  name: message-config
  namespace: {{ .Values.namespace_name  }}
data:
spring.datasource.url: jdbc:postgresql://{{ .Values.db_ip }}/{{ .Values.db_name }}apiVersion: "apps/v1"
kind: "Deployment"
metadata:
name: "hello-world"
namespace: {{ .Values.namespace_name }}
labels:
app: "hello-world"
spec:
replicas: 2
selector:
matchLabels:
app: "hello-world"
template:
metadata:
labels:
app: "hello-world"
spec:
containers:
- name: "hello"
image: "{{ .Values.gcp_region }}-docker.pkg.dev/{{ .Values.gcp_project }}/{{ .Values.artifact_repository }}/{{ .Values.image_name }}:{{ .Values.app_version }}"
ports:
- containerPort: 8080
env:
- name: spring.datasource.url
valueFrom:
configMapKeyRef:
name: message-config
key: spring.datasource.url
- name: spring.datasource.username
valueFrom:
secretKeyRef:
name: db-secret
key: username
- name: spring.datasource.password
valueFrom:
secretKeyRef:
name: db-secret
key: passwordapiVersion: v1
kind: Secret
metadata:
name: db-secret
namespace: {{ .Values.namespace_name }}
data:
username: {{ .Values.db_username | b64enc }}
password: {{ .Values.db_password | b64enc }}apiVersion: v1
kind: Secret
metadata:
name: db-secret
namespace: {{ .Values.namespace_name }}
data:
username: {{ .Values.db_username | b64enc }}
password: {{ .Values.db_password | b64enc }}Finally, in the values.yaml file in the root of the helm chart add the following
namespace_name: "${namespace_name}"
db_ip: "${db_ip}"
db_name: "${db_name}"
db_username: "${db_username}"
db_password: "${db_password}"
app_version: "${app_version}"
gcp_project: "${gcp_project}"
gcp_region: "${gcp_region}"
artifact_repository: "${artifact_repository}"
image_name: "${image_name}"
image_version: "${image_version}"
This Helm chart creates
-
Configuration file
-
Secret file
-
Deployment of our application
-
Loadbalancer with public IP
Deployment
We are finally ready to deploy everything. Run the following commands in your CLI. Terraform ini
This will initiate your project
terraform initThis will show you what resources you are about to create
terraform planThis will actually create the resources
terraform applyIf everything goes as expected, after a while the resources should be created and the application should be running in GKE.
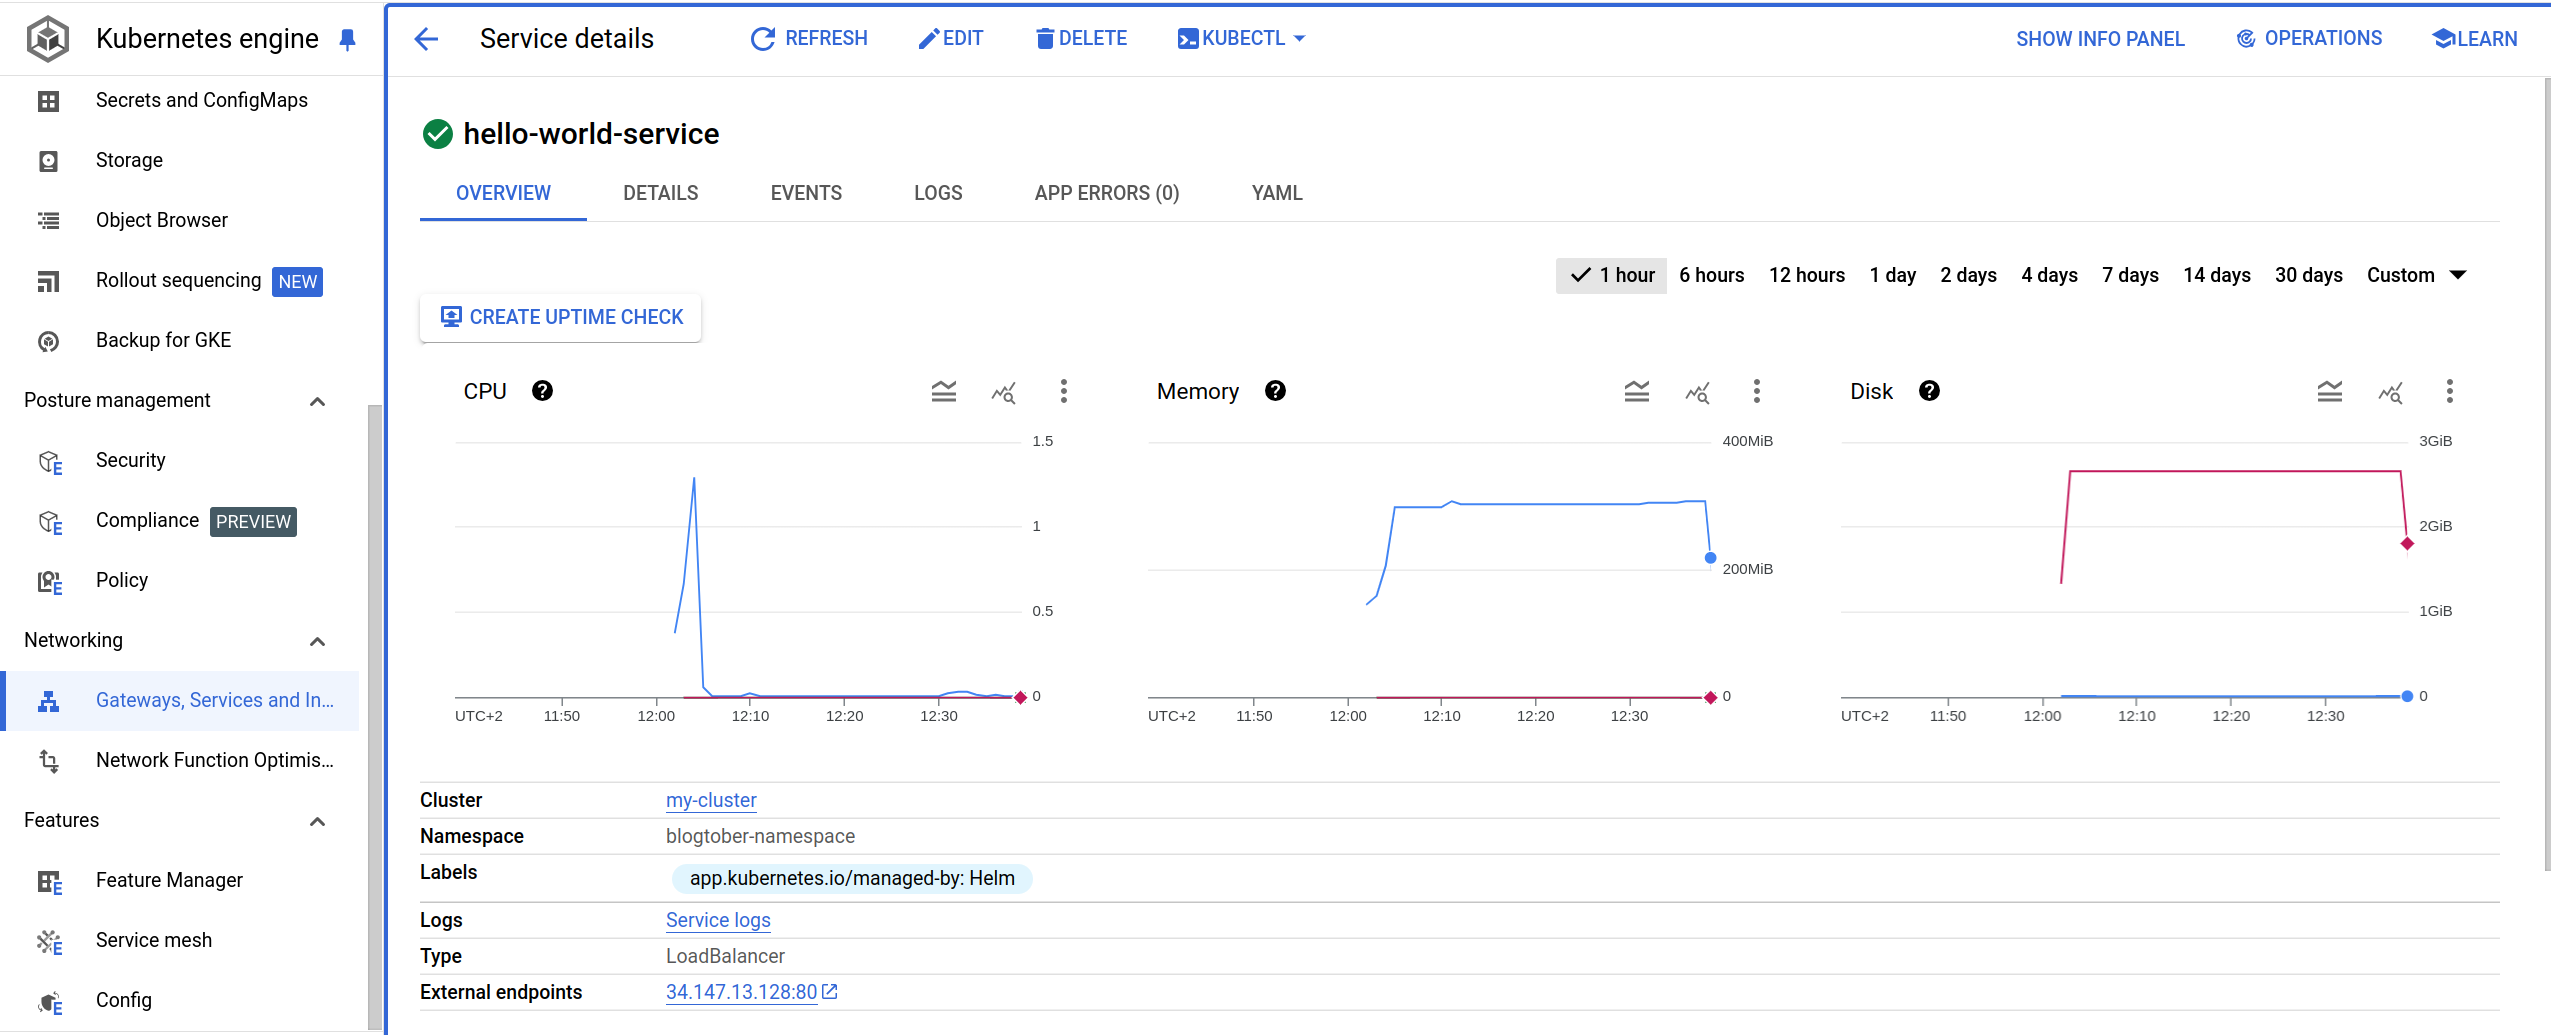
Navigate in the GKE console and find the service. in the external endpoints you can find the generated public ip of your application.

Now we can access the endpoints via curl or postman. There are 2 endpoints, one that writes in the database and one that reads from it.
curl -X POST <endpoint-ip>/write \
     -d "firstName=John" \
     -d "lastName=Doe"
curl -X GET "<endpoint-ip>/read?id=1"You should see this response
{"id":1,"firstName":"John","lastName":"Doe"}Beware that the application has no error handling so trying to access entry with id that does not exist will result in a 500 error.
You can finally destroy everything by running
terraform destroyDisclaimers
The code is not ready for production use
-
No bucket is configured for the terraform
-
For compactness everything in terraform is in one file, modules should be created, this way also the Artifact Registry step could be included
