Exploring the new Spring Security OAuth 2.0 and OpenID Connect support part 2
Now that it’s clear how to use an OAuth access_token in JWT to perform RBAC inside a REST service playing the role of resource server, it is time to see how to acquire such a token.
To keep the backend service(s) nice and clean I’ve separated the job of acquiring and refreshing an OAuth token, into an API Gateway.
The Set-up
Using the same Set-up as briefly mentioned in part 1.
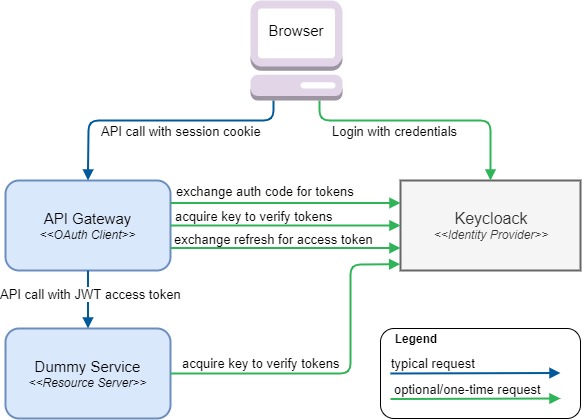
Looking closely at each of five arrows touching the API Gateway, it should be clear that this component has a lot more to deal with in terms of OAuth.
As part of the Login process it basically performs the following functions
-
It needs to acquire the actual
access_tokenandrefresh_tokenusing the OAuthauthorization codeas provided by the HTTP redirect url parameters after successful login -
It provides the browser with a session Cookie pointing to the internally stored tokens
As part of normal processing/proxying of HTTP requests it performs the following functions
-
It exchanges the Cookie header in incoming requests for an Authorization header holding a valid access_token
-
It proxies the HTTP requests to the appropriate service based on a very simple url-based mapping
As you may have already deducted, sending a valid access_token may indeed encompass a call to Keycloak in order to dynamically acquire a new access_token using the refresh_token. Now if that sounds like complicated logic you’d rather not write yourself, Spring Security got you covered ;)
Code, lots of it!
The basics
As stated in previous part, the API Gateway is implemented in an reactive style, partly to demostrate both ways of working with the Spring Security OAuth classes. But also because I feel a non-blocking thread-sharing architecture is a great fit for a Gateway.
Apart from the default dependencies that any reactive spring secured service would require:
org.springframework.boot:spring-boot-starter-security
org.springframework.boot:spring-boot-starter-webflux
org.springframework.security:spring-security-config
The new Spring Boot starter for OAuth clients should be added:
org.springframework.boot:spring-boot-starter-oauth2-clientThe reactive counterpart of creating a WebSecurityConfigurerAdapter to enable security is somewhat different.
Without any subclassing you should expose a SecurityWebFilterChain as bean and @EnableWebFluxSecurity.
@EnableWebFluxSecurity
public class SecurityConfig {
	@Bean
	public SecurityWebFilterChain securityWebFilterChain(final ServerHttpSecurity http) {
		return http
			.authorizeExchange()
			.matchers(pathMatchers("/api/**")).authenticated() // require a logged-in user for api calls
			.anyExchange().permitAll()
			.and().httpBasic().disable()
			.csrf().disable()
			.oauth2Client()
			.and()
			.oauth2Login()
			.and()
			.build();
	}
}
Unfortunately I couldn’t get the ReactiveUserDetailsServiceAutoConfiguration to backoff so I had to do it myself for now.
@EnableConfigurationProperties
@SpringBootApplication(exclude = ReactiveUserDetailsServiceAutoConfiguration.class)
public class GatewayApplication {
	public static void main(String... args) {
		SpringApplication.run(GatewayApplication.class);
	}
}
For the actual OAuth configuration, Spring Security needs to know where all the horizontal arrows (in the diagram) need to point to:
spring:
  security:
    oauth2:
      client:
        registration:
          keycloak:
            client-id: gateway
            client-secret: 42aad01b-414e-4a80-8e6d-7b9332b3aebe
            clientName: Keycloak
            authorization-grant-type: authorization_code
            redirectUri: '{baseUrl}/login/oauth2/code/{registrationId}'
            scope:
              - openid
              - profile
              - email
        provider:
          keycloak:
            authorization-uri: http://localhost:9090/auth/realms/service/protocol/openid-connect/auth
            token-uri: http://localhost:9090/auth/realms/service/protocol/openid-connect/token
            user-info-uri: http://localhost:9090/auth/realms/service/protocol/openid-connect/userinfo
            jwk-set-uri: http://localhost:9090/auth/realms/service/protocol/openid-connect/certs
            user-name-attribute: preferred_username
Quite a bit more than the Dummy Service needed, but also highly configurable.
The client-id and client-secret should correspond to what Keycloak generated after you configuration of a new private client.
The user-name-attribute tells Spring Security which property from user-info-uri endpoint should be used as the name of the principal.
Considering a JWT-based access_token is used, the preferred_username could also have been read from the claims inside the token, but Spring Security always uses the user-info-uri instead.
|
Done?
Well, nearly. The Login and hooking into the Spring Security Context as authorized user is indeed done.
But in order for the service to properly proxy the request to the Dummy Service, some custom code is needed to perform some basic proxying based on Spring’s new Reactive HTTP client WebClient. (Not tested beyond this exploration use-case.) After which some Spring Security magic can be configured to augment the WebClient based requests to the Dummy Service with proper token header.
The proxying
Using WebFlux I’ve implemented the proxy by exposing RouterFunction as a bean.
It basically uses a virgin WebClient to make a call that is nearly the same as the incoming request, filtering some headers, and changing the path and uri as followed:
http://gateway/api/service_name_1/test/etc => http://service_uri_1/test/etcUsing the built-in support for path variables for any RequestPredicates.path based predicate.
@Configuration
public class ProxyConfig {

	private static final String API_PREFIX = "/api/";
	private static final List<String> STRIPPED_HEADERS = Arrays.asList(COOKIE, SET_COOKIE,
			SET_COOKIE2, HOST, TRANSFER_ENCODING, CONNECTION, "keep-alive");

	private final GatewayConfig config;

	public ProxyConfig(final GatewayConfig config) {
		this.config = config;
	}

	@Bean
	public RouterFunction<ServerResponse> proxy() {
		final WebClient webClient = WebClient.create();
		return route(path(API_PREFIX + "{service}/**"),
			request -> webClient.method(request.method())
				.uri(toBackendUri(request))
				.headers(cleanedHeaders(request.headers().asHttpHeaders()))
				.body(fromDataBuffers(request.exchange().getRequest().getBody()))
			.exchange()
			.flatMap(response -> ServerResponse.status(response.statusCode())
				.headers(cleanedHeaders(response.headers().asHttpHeaders()))
				.body(fromDataBuffers(response.body(toDataBuffers())))));
	}

	private Consumer<HttpHeaders> cleanedHeaders(final HttpHeaders httpHeaders) {
		return headers -> {
			headers.putAll(httpHeaders);
			STRIPPED_HEADERS.forEach(headers::remove);
		};
	}

	private String toBackendUri(final ServerRequest request) {
		final String service = request.pathVariable("service");
		final String backend = config.backend(service);
		return UriComponentsBuilder.fromUriString(backend)
			.path(request.path().substring(API_PREFIX.length() + service.length()))
			.queryParams(request.queryParams())
			.build().toString();
	}
}
It uses the completely data type agnostic fromDataBuffers and toDataBuffers to directly transfer the incoming stream to the outgoing data stream for both the request and response.
As for the corresponding configuration POJO and yaml
@ConfigurationProperties("gateway")
public class GatewayConfig {

	private Map<String, String> routes = new HashMap<>();

	public Map<String, String> getRoutes() {
		return routes;
	}

	public String backend(String service) {
		return routes.get(service);
	}
}
gateway:
routes:
service1: http://localhost:9081Quite a bit code, but enough for a basic configurable one-to-many HTTP gateway.
The token augmentation
The class that is going to perform the actual augmentation (adding of the Authorization header with the access_token) is ServerOAuth2AuthorizedClientExchangeFilterFunction. Which is an ExchangeFilterFunction as usable by WebClient to mutate outgoing request chains passing through. In much the same way as a WebFlux WebFilter would for incoming requests.
| Starting Spring Security 5.2 as part of this effort most of its logic has been decomposed into other classes, paving the way for rolling similar functionality in other places such as Spring Cloud Gateway filters. |
As can be read from these method level JavaDocs, usage is a two-step process.
-
One-time configuration of the WebClient with a properly configured instance of ServerOAuth2AuthorizedClientExchangeFilterFunction
-
Amending each request, for which the filter should trigger, with an attribute pointing to the proper
OAuth2AuthorizedClient
OAuth2AuthorizedClient holding the user specific access_token, refresh_token and other general details about the provider.
Time to amend the previous ProxyConfig code with these two bits:
...

private final ReactiveOAuth2AuthorizedClientService authorizedClientService;

@Bean
WebClient tokenAugmentingWebClient(final ReactiveClientRegistrationRepository clientRegistrationRepository,
					final ServerOAuth2AuthorizedClientRepository authorizedClientRepository) {
	// step 1: configure WebClient to use the filter, and expose as bean
	return WebClient.builder()
		.filter(new ServerOAuth2AuthorizedClientExchangeFilterFunction(clientRegistrationRepository, authorizedClientRepository))
		.build();
}

@Bean
public RouterFunction<ServerResponse> proxy(WebClient webClient) { // use the pre-configured webClient been
	return route(path(API_PREFIX + "{service}/**"),
		request -> authorizedClient(request)		// step 2a: acquire attrConsumer to add the proper OAuth2AuthorizedClient
			.map(attrConsumer -> webClient.method(request.method())
				.uri(toBackendUri(request))
				.headers(cleanedHeaders(request.headers().asHttpHeaders()))
				.body(fromDataBuffers(request.exchange().getRequest().getBody()))
				.attributes(attrConsumer))	// step 2b: use attrConsumer to add the request attributes
		...
}

private Mono<Consumer<Map<String, Object>>> authorizedClient(final ServerRequest request) {
	return request.principal()
		.cast(OAuth2AuthenticationToken.class)
		.flatMap(this::loadAuthorizedClient)
		.map(ServerOAuth2AuthorizedClientExchangeFilterFunction::oauth2AuthorizedClient);
}

private Mono<OAuth2AuthorizedClient> loadAuthorizedClient(OAuth2AuthenticationToken authentication) {
	return authorizedClientService.loadAuthorizedClient(authentication.getAuthorizedClientRegistrationId(), authentication.getName());
}

...
The contract to actually add the Authorization header to the request is implicit. The logic will fire for all requests with the OAuth2AuthorizedClient attribute present.
|
That’s it!
Any request to a configured backend service will now contain an Authorization header with Bearer <JWT_access_token>.
More importantly, in case the session-stored access_token is (nearly) expired,
the ServerOAuth2AuthorizedClientExchangeFilterFunction will automatically first acquire a new access_token before the actual request is proxied.
Explore the full source-code to play with at GitHub which also contains a description on how to configure Keycloak.
