Exploring the new Spring Security OAuth 2.0 and OpenID Connect support part 1
How many lines of code do you actually need to implement external Role Based Access Control (RBAC) using OAuth, JWT with the new Spring Security features? Lets find out!
Spring Security has been working for a while on first-class support for OAuth 2.0, build from scratch as part of the framework itself. Supporting additional specs such as OpenID Connect and Javascript Object Signing and Encryption (JOSE). Starting version 5.2 most of this new meat has been neatly distributed across two distinct trees of extendable/reusable classes. One for securing (normal) thread-per-request based services and one Reactive counterpart to secure non-blocking reactive apps.
Now before diving into some code samples based on both sets of classes, lets first talk about the actual benefits of OpenID Connect and JOSE support.
For those of you who are as confused as I was about OpenID vs OAuth, let be provide you the gist of it. OpenID is an outdated spec separate from OAuth. But OpenID Connect actually is a small specification which standardizes
a simple identity layer on top of the OAuth 2.0 protocol
With the specification of an additional id_token, which could used for passing around user details without implication of authorization being the most relevant. Furthermore it standardized the usage of JWT as OAuth token format and leverages JWK Set Format from JOSE to standardize retrieval/distribution of signing keys. Think services acquiring the key to verify a JWT from an external url (allowing for key-rotation) rather than needing a predefined (set of) key(s).
What’s in it for us
Social Login
I guess its good to state that you can pretty much configure Login based on redirection to your favorite tech giant without any code at all.
Integration with your Enterprise RBAC solution
In recent years OAuth 2.0 has been gaining track within the enterprise world as a general federated identity (SSO) solution. Together with some additional standardization from OpenID Connect the future seems bright for this. This exploration will therefore be about doing some basic RBAC but leaving the actual user and role management up to an external product, Keycloak in this case.
I choose Keycloak for this exploration because
The Set-up
The diagram below hopefully provides insight in the general architecture we’re going for.
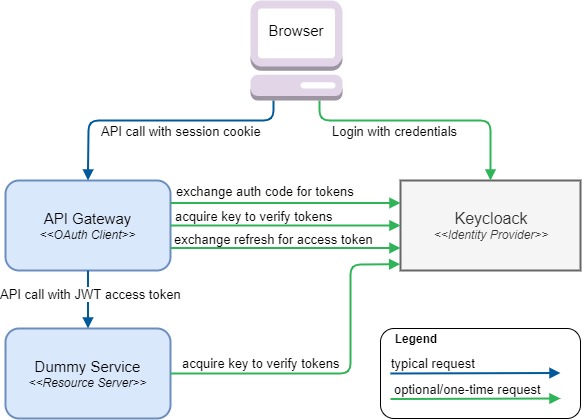
The Dummy Service will be serve as general example of how to use Spring Security 5.2 to secure a typical service playing the OAuth role of resource server.
Any (machine) user that calls it is responsible for providing a valid OAuth access_token, in our case a Bearer token in the format of a JWT.
Apart from a typical OAuth access_token, JWT allows for easy transport of AuthN/AuthZ related claims such as a username, or roles/permissions.
Which is great, because this service does not have to make any round-trip to the original identity provider service for such information.
The API Gateway will serve as example of performing an OAuth 2 Authorization code flow based Login with session management.
Furthermore it will display how to augment HTTP requests with the proper OAuth bearer token as required by the resource server.
Key take-away being that the access/refresh token as acquired from Keycloak will never be exposed to the browser.
In the interest of exploration, I’ll be using the Servlet-based stack for the Dummy Service and create a WebFlux-based a API Gateway to provide some examples of Spring Security OAuth support for both ways.
As soon as Spring Cloud Gateway has a Spring Security 5.2 compatible release, I’m sure the same API Gateway logic could be achieved using that.
Given that it’s only a layer on top of WebFlux. For proxying just HTTP requests though, I feel it doesn’t really add enough to justify adding a spring-cloud dependency.
|
Code, finally!
Congrats if you made it this far, actual usable code beyond this point I swear.
Dummy Service
Apart from the default dependencies that any spring secured service would require:
org.springframework.boot:spring-boot-starter-security
org.springframework.boot:spring-boot-starter-web
org.springframework.security:spring-security-config
it also needs the following new OAuth specific dependencies:
org.springframework.security:spring-security-oauth2-jose
org.springframework.security:spring-security-oauth2-resource-server
Note that the oauth2-jose dependency relies on nimbus-jose-jwt to do most of the JWT specific heavy lifting.
|
As usual when building Spring Security secured services, it starts with a WebSecurityConfigurerAdapter.
@EnableWebSecurity
public class SecurityConfig extends WebSecurityConfigurerAdapter {
    protected void configure(HttpSecurity http) throws Exception {
        http
            .sessionManagement().sessionCreationPolicy(SessionCreationPolicy.STATELESS).and()
            .authorizeRequests()
            .anyRequest().authenticated().and()
            .oauth2ResourceServer().jwt();
    }
}
Now the second part would be to configure from where to acquire the (public) key to verify that any incoming JWT is actually signed properly.
spring.security.oauth2.resourceserver.jwt.jwk-set-uri: http://localhost:9090/auth/realms/service/protocol/openid-connect/certsDone!
As shown by the property name the aforementioned JWK Set is used as format for transport of signing keys.
|
Any request should now carry a valid JWT in order to enter any of your (Rest)Controller methods and is used to populate the SecurityContext.
You can directly acquire the Principal from the Context using the relatively new @AuthenticationPrincipal annotation as demonstrated below.
@RestController
public class HelloController {

	@GetMapping("/hello")
	public Map<String, String> hello(final @AuthenticationPrincipal Jwt jwt) {
		System.out.println("headers:\n" + jwt.getHeaders());
		System.out.println("\nclaims:\n" + jwt.getClaims());
		return Collections.singletonMap("message", "Hello " + jwt.getClaimAsString("name"));
	}
}
The System.out provides the following insights into the header:
headers:
{kid=re9EPxwYX3eJmsK9x6ifu0P__2ZY11JM5gSDTEUPCWw, typ=JWT, alg=RS256}
The headers fields, now also known and standardized as the JOSE header provide the service with just enough information to know how to validate the token.
Specifying with kid the key id to designate which key(pair) was used to sign the token.
The RS256 alg states that an RSA based algorithm was used together with a 256 bit SHA. See this table for a full list of options.
Now logic dictates that for any validation to work in the Dummy Service, the previously entered jwk-set-uri should at least provide a set of keys containing a key with the same kid.
A quick browse to the configured keycloak endpoint yields:
{
   "keys":[
      {
         "kid":"re9EPxwYX3eJmsK9x6ifu0P__2ZY11JM5gSDTEUPCWw",
         "kty":"RSA",
         "alg":"RS256",
         "use":"sig",
         "n":"...",
         "e":"AQAB",
         "x5c":[
            "..."
         ],
         "x5t":"EiuTu2dKoCsyTkCZnX5u0Tb_JwM",
         "x5t#S256":"RfslBiw2TAHiDxYy_P2ZkH4TGCsVQvKrO04QBxqVFUE"
      }
   ]
}
Indeed it does! With x5c holding the X.509 Certificate Chain as ordered list, with the key-holding cert as first entry as specced here.
Fun fact, the n parameter also provides the raw public-key part of the RSA keypair. Which of these two is actually used during the verification I’ll leave to you and your debugger.
|
The System.out provides the following insights into the claims:
claims:
{
    typ=Bearer, iss=http://localhost:9090/auth/realms/service,
    nbf=1970-01-01T00:00:00Z, exp=2019-10-07T16:15:58Z, iat=2019-10-07T16:10:58Z,
    auth_time=1570464658, scope=openid email profile,
    name=Robbert van Waveren, email=..., preferred_username=robbert,
    sub=a72631ef-368b-439f-8572-1f15ff4bda4c, aud=[account], acr=1, azp=gateway,
    resource_access={"account":{"roles":["manage-account","manage-account-links","view-profile"]}},
    realm_access={"roles":["dummy","offline_access","uma_authorization"]},
    etc...
}
A seen above, it contains a mix of JWT standardized 3-letter acronym claims and keycloak specific ones.
The most interesting one is probably exp which designates when it expires and should no longer be considered a valid access_token.
Custom RBAC
The (optional) next step would be to require the Jwt to contain a claim of having a specific Role that the service would require. How this claim looks like is of course highly dependent on the actual identity provider that created the token. It is therefore only logical that Spring Security allows for delegating the acquisistion of permissions from the Jwt to custom code.
Lets amend the previous code in the SecurityConfig.configure method with a few more lines:
final JwtAuthenticationConverter jwtAuthenticationConverter = new JwtAuthenticationConverter();
jwtAuthenticationConverter.setJwtGrantedAuthoritiesConverter(new KeycloakRealmRoleConverter()); // delegate to custom converter

	...
	.authorizeRequests()
.antMatchers("/**").hasRole("dummy") // require the user to have the "dummy" role
	.anyRequest().authenticated()
	...
	.oauth2ResourceServer().jwt()
.jwtAuthenticationConverter(jwtAuthenticationConverter); // apply jwt converter
As shown in the code, basically the jwtAuthenticationConverter builder method can be used to trigger custom conversion.
Keycloak allows for using either resource_access for roles per service or using realm_access for using roles per realm.
The example below uses realm_access, which still allows for requiring different roles for different requests/services.
Keycloak also provides custom libraries that may or may not be up-to-date when you read this, but again I prefer a no magic approach for this exploration.
|
The custom converter, (which could also just be a lambda if you prefer):
public class KeycloakRealmRoleConverter implements Converter<Jwt, Collection<GrantedAuthority>> {
	public Collection<GrantedAuthority> convert(final Jwt jwt) {
		final Map<String, Object> realmAccess = (Map<String, Object>) jwt.getClaims().get("realm_access");
		return ((List<String>)realmAccess.get("roles")).stream()
			.map(roleName -> "ROLE_" + roleName) // prefix to map to a Spring Security "role"
			.map(SimpleGrantedAuthority::new)
			.collect(Collectors.toList());
	}
}
That’s it, the service now requires the Jwt to at least have its claims property contain {realm_access: {roles: ["dummy"]}, which is exactly what Keycloak will do if you create a role called "dummy" and add it to a user. But more on that later.
Continue to Part 2 (live at 15-10-2019)
Explore the full source-code to play with at GitHub
