Automating hosting RevealJS slides on GitLab
RevealJS is an awesome tool made with JavaScript, which allows you create slides for a presentation using HTML or if you use a plugin, Markdown. The great thing about that is, that you could have your slides in git, with proper version control. To run your slides, all you need is a web server which serves static content, for example you could do this locally using Python’s SimpleHttpServer. That’s where GitLab comes in, with GitLab pages you can host any static web content you want, so that’s what I will show in this blog, automatically hosting your RevealJS slides on GitLab with every commit of your slides.
What are we going to do?
The idea is to create a RevealJS template, which you can customize with your own styling, that can be used for all your slides. So for JDriven we have created a RevealJS template which has our logo on the top left, and uses our green color for the progress bar and buttons at the bottom. We can use the RevealJS template in GitLab CI, to automatically deploy the RevealJS template and our slides to GitLab Pages. So your slides will be hosted and available to everyone you want.
Creating the RevealJS template
The first step we need to take is to create a repository for your RevealJS template.
I called mine revealjs-template, really original, I know.
In this repo, create a file named .gitlab-ci.yml, a file Dockerfile, and a directory revealjs.
Next we are going to download RevealJS from GitHub
(Note: you could also clone it, customise everything you want, build RevealJS yourself, and use the resulting dist folder. But for simplicity we are using a pre-built RevealJS version).
Unpack the zip, we need the following things from this: the dist directory, the plugins directory, and index.html file.
Place these two directories and file in the revealjs directory we just created in our repository.
Now we need to modify our index.html file a bit - as we want to reuse this for all our slides, and also make sure it uses markdown.
Although you could also use HTML for creating a slide, I prefer to have markdown as it is easier to write and maintain.
So modify the section which has an example Slide 1 and 2, to the following:
<div class="reveal">
  <div class="slides">
    <section data-markdown="slides.md"
      data-separator="^---slide---"
      data-separator-vertical="^---vertical---"
      data-separator-notes="^Note:">
    </section>
  </div>
</div>
Feel free to modify this file to your liking! You can use other data seperators, you can add a favicon, custom css, the posibilities are endless.
Now we have RevealJS ready, we can build a docker image that contains this template.
Don’t worry if you don’t have docker, or don’t have any experience with it, we will let GitLab CI do all the work.
Add the following to the Dockerfile we just created:
FROM alpine:latest

COPY revealjs /public
This docker image seems useless, as it only copies the contents of our RevealJS template to the public folder, but we will use this docker image to deploy our slides later.
And finally we need to actually build and deploy our docker image using GitLab CI. So add the following to the .gitlab-ci.yml file we just created:
image: docker:latest
services:
- docker:dind

build-image:
  script:
    - docker login -u gitlab-ci-token -p $CI_JOB_TOKEN $CI_REGISTRY
    - docker build -t $CI_REGISTRY_IMAGE .
    - docker push $CI_REGISTRY_IMAGE
So what we have done here is use GitLab CI to build our docker image, and publish it to the GitLab Container Registry.
This way our image is ready to be used by our slides.
How this works is that GitLab uses the contents of .gitlab-ci.yml to create a build pipeline everytime you commit.
So you could also do a mvn clean install for example for your Java projects, but in this case all we need is to create our docker image.
Creating and hosting your slides
Now that our template is ready, we can use this to host slides on any repo.
So lets say you are creating a Java workshop, which has lots of code and exercises.
It’s nice to have all that in GitLab too. So create a java-workshop repository, and place everything for your workshop there.
Next we want to add the slides in this repository too, so create the directory slides, and the file .gitlab-ci.yml.
Inside the slides directory, create the file slides.md, which will have the content of our slides.
And in the same directory you can for example add images that you use within your slides.
For example you can have the following in the slides.md file:
# Hello World

This is the first slide

---vertical---

# Nice vertical slide!

---slide---

# And the final slide!
Now that we have our awesome slides and template ready, we want to host this on GitLab Pages. First we need to determine the url for your revealjs-template docker image. On GitLab go to your template repository, click on 'Packages & Registries' and then on 'Container Registry', you should then see something similar as the following:
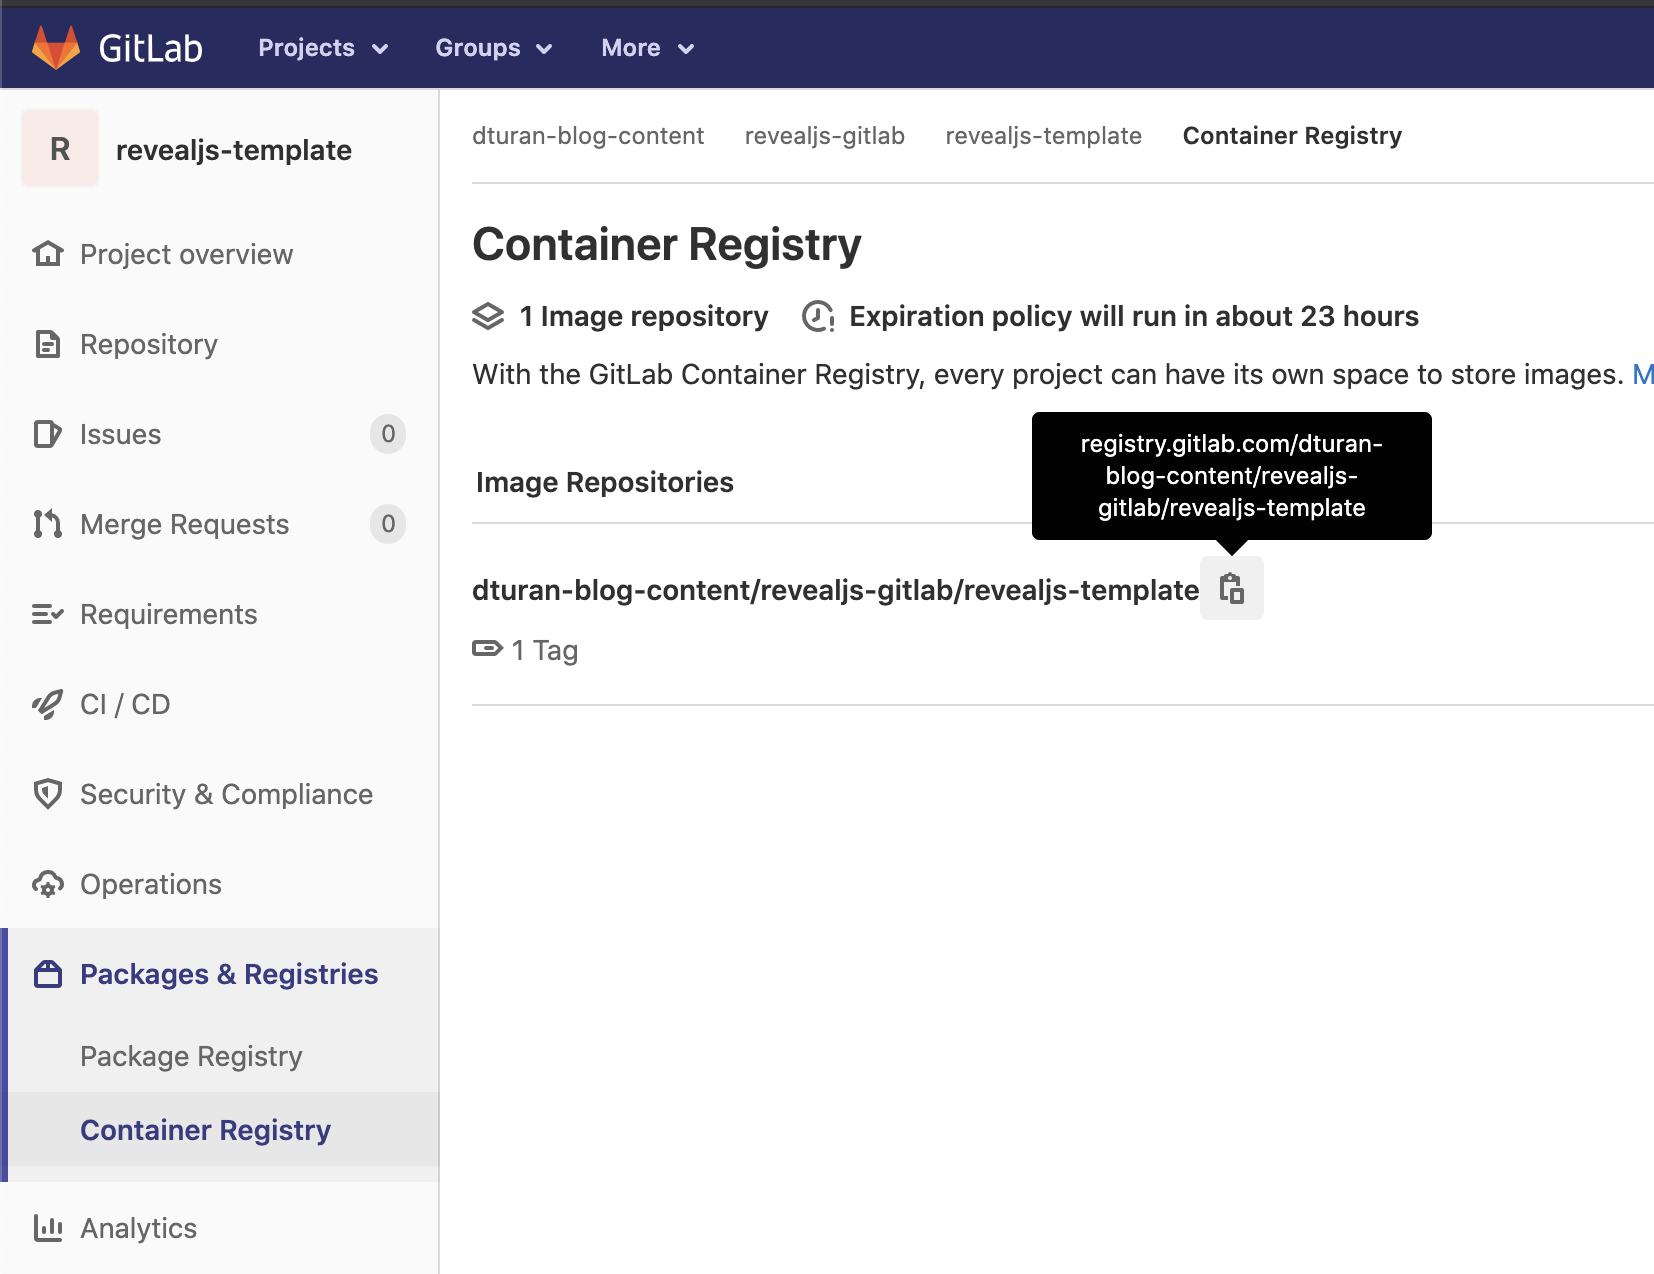
When you click the copy icon it will copy the url you need. Add the following to your .gitlab-ci.yml (replace the url behind image: with the url you just copied from the container registry):
stages:
  - pages

pages:
  image: registry.gitlab.com/dturan-blog-content/revealjs-gitlab/revealjs-template
  stage: pages
  script:
    - mv /public public
    - mv slides/* public
  artifacts:
    paths:
      - public
What this does is use our RevealJS docker image we created, and moves our template directory (which comes from our docker image) to the public directory.
Next it moves the contents of the slides directory inside the same public directory.
So our slides.md is beside our index.html now.
And finally we publish our public directory as an artifact, and because our job is named pages GitLab automatically hosts the public artifact on GitLab Pages.
(Note: If this is a bit confusing, check out the GitLab documentation, it is some GitLab magic to easiliy host static web content)
Viewing your slides
If everything went well, you should see a successfull pipeline in your workshop repository (Click on 'CI/CD' on the left, then 'Pipelines'). To find the url for your hosted slides, go to Settings and then Pages, and you should see the following:
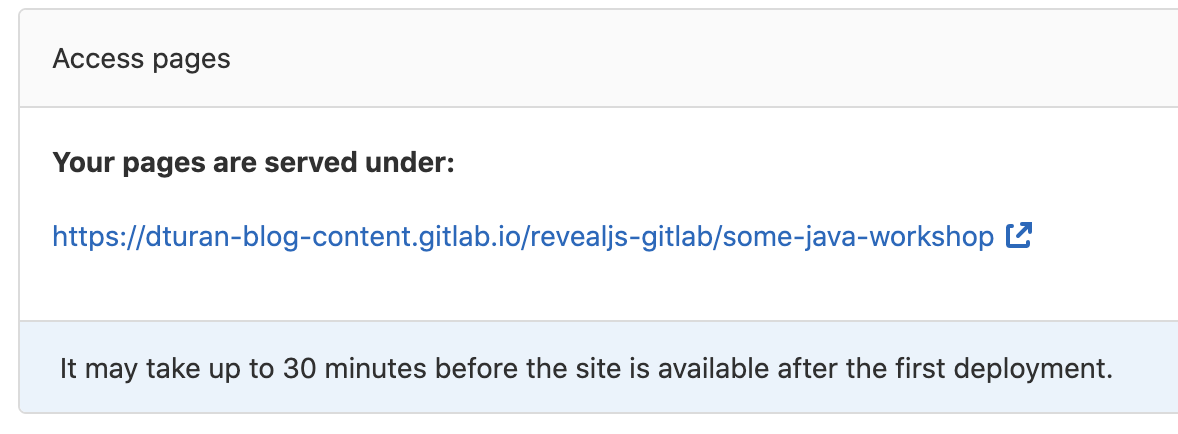
Click on the url and view your slides in all it’s glory! I usually also copy this link and add it to the README of the repo, so it’s easier to find.
Next steps
So if you have all this working, you can start customising whatever you want. As I mentioned you can add a favicon, change the themes, colors and fonts, add some custom code to the slides, etc. You could also add a toggle to switch between a dark and light theme, so you can change your slides on the fly based on the lighting in the room. The fun thing about this setup is, that if you change the template, all slides you have will automatically use the latest version of your template when you trigger another pipeline for the slides (or that happens automatically when you change the slides).
If you want to see a full working example, check out my example code on GitLab. For the slides I also added some extra slides with some examples on how to do things. Enjoy!
