Securing Spring Microservices with Keycloak - Part 1
These days companies gather and manage vast amounts of user data. Loss of this data will expose companies to financial/legal liabilities or damages to their brand. This is because over the last years, governments have introduced new regulations like the General Data Protection Regulation (GDPR). Because of this, security is a major cross-cutting concern for application architecture. This two-part blog post explains how you can leverage Keycloak to secure your Spring microservices. The first blog will focus on how to install and configure Keycloak. The second blog will show how to use Keycloak to secure your Spring Boot microservices.
What is Keycloak?
Keycloak is a modern open source Identity and Access Management solution. It enables us to secure all sorts of frontend applications (apps) / services and offers the following features:
-
Single Sign-On
-
Identity Brokering and Social Login
-
User Federation
-
Client Adapters
-
Standard Protocols
-
Admin Console
-
User Account Management Console
A corporate version, known as Red Hat Single Sign-On (SSO), is also available from (and supported by) Redhat. The support and the ability to connect to existing identity systems make it a good fit for large organisations.
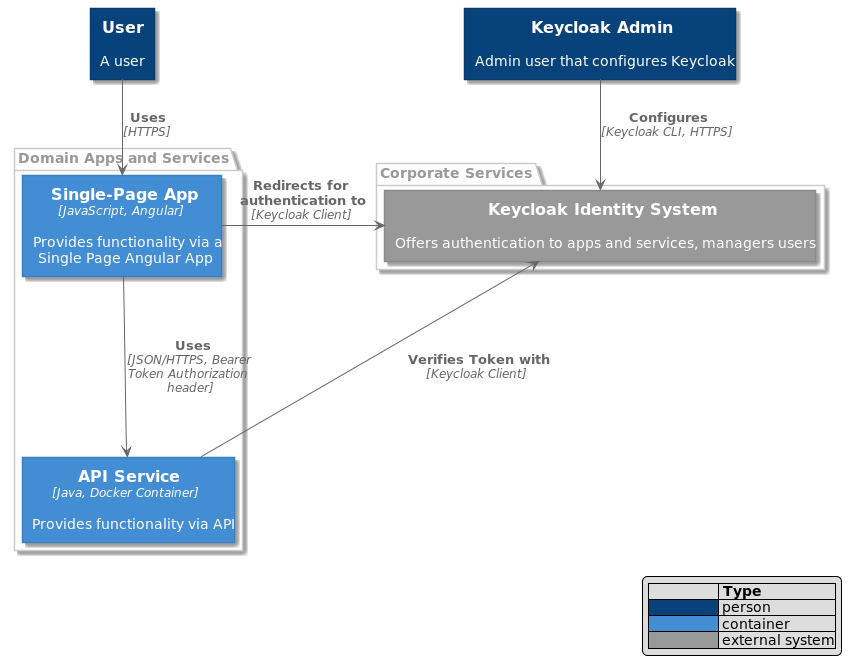
How it works
Image that there is already a Keycloak system setup in your organisation and you use it to secure your apps and services. Any unauthenticated user will be redirected to the Keycloak login page. After succesful login the user is redirected back to the application but with an additional authorization header. On this access the app only has to verify the token provided. When making calls to backend API services, frontend applications will need to provide the same authorization token in the request header. The backend service will use the information in the token to authenticate the user with keycloak and authorize access to endpoints.
Setup Keycloak
We will be using Docker to quickly get Keycloak up and running. You can easily clean your system afterwards by deleting the containers. Basic knowledge of Docker will be required. First we need to download the Keycloak image and start a container instance. This will start the Keycloak server in the background and expose ports 8080 and 9990 locally. Make sure that these ports aren’t already used by other services on your system.
docker run -d --name=keycloak \
  -p 8080:8080 \
  -p 9990:9990 \
  -e KEYCLOAK\_USER=keycloak\_admin -e KEYCLOAK\_PASSWORD=eeX2uque \
  jboss/keycloak
The container ID will be printed on success. We can verify that Keycloak is running with docker ps:
CONTAINER ID        IMAGE               COMMAND                  CREATED             STATUS              PORTS                                            NAMES
2a8195a074a7        jboss/keycloak      "/opt/jboss/docker..."   24 seconds ago      Up 23 seconds       0.0.0.0:8080->8080/tcp, 0.0.0.0:9990->9990/tcp   keycloak
Configuring Keycloak
Keycloak CLI
Because of the Infrastructure as Code principal we will only use the CLI admin console. I recommend using the CLI based tools as much as possible. It is easy to integrate commands in pipelines or scripts that can be versioned, reviewed, etc… The Keycloak image comes packaged with the admin cli console so let’s start a new container to use this tool. The container is automatically deleted when we exit it.
docker run --name=kcadm.sh --network="host" --rm -it \
  --entrypoint /bin/bash jboss/keycloak
The tool is called kcadm.sh and is located in the /opt/jboss/keycloak/bin/ folder.
Because the path is rather long to type, we first create an alias. From this point the commands are executed in the temporary container
alias kcadm.sh=/opt/jboss/keycloak/bin/kcadm.shFirst we have to login our CLI console. Provide the user and password that we passed as environment variables when starting Keycloak container.
kcadm.sh config credentials \
  --server http://localhost:8080/auth \
  --realm master \
  --user keycloak\_admin
Creating a Realm and Clients
Now we can create a Keycloak Realm. A realm manages a set of users, credentials, roles, and groups. An user belongs to and logs into a realm. Realms are isolated from one another and can only manage and authenticate the users that they control.
kcadm.sh create realms \
  --set realm=springservice \
  --set enabled=true
Next we create a client. Clients are entities that can request Keycloak to authenticate a user. Most often, clients are applications and services that want to use Keycloak to secure themselves and provide a single sign-on solution. Clients can have different login flows. If someone access your web app and isn’t logged in then you can redirect them to the keycloak login page. However for API services you don’t want to redirect to a login page because you only expect automated requests from other systems. The token that the frontend received can be used on any request to a backend API service. For now we create a client that allows redirects to the login page. The redirectUris should list all uri’s of your applications from which you need access.
kcadm.sh create clients \
  --target-realm springservice \
  --set clientId=login-app \
  --set directAccessGrantsEnabled=true \
  --set publicClient=true \
  --set 'redirectUris=\["http://localhost:8081/\*"\]' \
  --id
Creating Users and their Roles
Next up, creating a role and a user. Lastly we will set the user password and assign the role to the user.
Create the ROLE_USER role
kcadm.sh create roles \
  --target-realm springservice \
  --set name=ROLE\_USER -o
Create user1
kcadm.sh create users \
--target-realm springservice \
--set username=user1 \
--set email=user1@testdomain.nl \
--set enabled=true \
--output --fields id,username
Set the password for user1
kcadm.sh set-password \
--target-realm springservice \
--username user1 \
--new-password ooR9ooha
Add the ROLE\_USER role to user1
We can only use the username if it is unique, else use --uid
kcadm.sh add-roles \
  --target-realm springservice \
  --uusername user1 \
  --rolename ROLE\_USER
Groups
An good alternative is to create a Group. Then assign roles to the group and add the user to that group. All users in a group will automatically inherit al the roles of the group. It enables you to edit the roles for a large group of users at the same time.
Verifying
Now let’s verify if we are actually able to get a login token from keycloak!
curl -s -X POST \
-H 'Content-Type: application/x-www-form-urlencoded' \
-d 'username=user1&grant\_type=password&client\_id=login-app&password=ooR9ooha' \
http://localhost:8080/auth/realms/springservice/protocol/openid-connect/token
You get the output below when your authentication request worked!
{
  "access_token": "SOME LONG TOKEN STRING HERE",
  "expires_in": 300,
  "refresh_expires_in": 1800,
  "refresh_token": "SOME LONG REFRESH TOKEN STRING HERE",
  "token_type": "bearer",
  "not-before-policy": 0,
  "session_state": "7df6d62a-bd76-4cfe-b88f-6dba4348faf9",
  "scope": "profile email"
}
You could use this result to access a secured app or API by providing the Authorization header with the bearer access\_token.
curl -s -X GET \
-H 'Authorization: Bearer <ACCESS\_TOKEN HERE>' \
http://localhost:8081/api/someendpoint
The next blog will explain how to create a Spring Boot microservice and secure it with Spring Security and Keycloak.
