If we want to know which version of PlantUML we are using we can use the command line option -version.
PlantUML will print the version and also some extra information like the machine name, memory and more.
But we can also create a PlantUML definition with the command version and we can transform it to a graphical presentation like a PNG image.
This can be handy if we use PlantUML in an environment like Asciidoctor with diagram support and we want to know which version of PlantUML is used.
In our first example we run PlantUML from the command line and use the -version option:
Continue reading →
PlantUML has a fun command to create a Sudoku puzzle.
We must use sudoku in our PlantUML definition and a random puzzle is generated.
We can even give a seed value for a given Sudoku so it is generated again.
In the following example PlantUML definition we use the sudoku command:
@startuml
sudoku
@enduml
Continue reading →
With PlantUML we can include external files in our definition with the !include directive.
We specify the file name and the content is included in our PlantUML definition.
The included file can also have multiple @startuml ... @enduml sections and we can refer to individual sections with the !include directive.
We must append to the include file name an exclamation mark (!) followed by either a number or identifier.
If we use a number we specify which section we want to include, where section are numbered starting from 0.
So to get the second section from a file commons.puml we would write !include commons.puml!1.
Alternatively we can use identifiers in the include file.
We append to @startuml an identifier as (id=idValue).
Then from the definition that is including the file we refer to the identifier after an exclamation mark (!).
If our included file commons.puml has a section with id user then we would include it as !include commons.puml!user.
In the following example PlantUML definition we define the file to be included.
We have two sections with @startuml ... @enduml which both have an identifier:
Continue reading →
To change the styling of our generated diagrams with PlantUML we can use the skinparam command. We can set for example font size, style, color, background colors and much more. We can change the style for a specific element or for the whole diagram. We can even set specific styling options for stereotypes. The settings for the stereotype are then applied to all elements in our diagram with that stereotype. We must append <<stereotype name>> to the skin parameter name.
In the following example PlantUML description we apply custom background colors to each stereotype:
Continue reading →
When we write a PlantUML definition the generated graphical diagram is laid out by PlantUML.
In a previous post we learned how to move elements using the length of the connection.
But we can also use a together block with all elements that should be at the same level.
PlantUML will try to keep the elements together when the diagram is drawn.
In the following sample PlantUML definition we want the PostgresDB and Mail elements to be at the same level, so we group them using a together block:
Continue reading →
My colleague, Erik Timmers, and I often have discussions about programming and related technologies.
This blog post is the result of one of those discussions.
We discovered that the function Promise.race didn’t exactly do what we expected.
So we tested it, figured out how it worked, found out what we thought was wrong, and finally created a version of the Promise.race function that does what we expected.
After that we went a little bit further…and added some functionality to the function.
Please note that this code shouldn’t be used in production, or at the very least, it should be tested a bit more.
We did it “because we could”, but also because we wanted to understand the functionality.
If you would like to view, extend, learn from the actual code, the source code is also available on GitHub.
Continue reading →
By default elements in a PlantUML generated diagram have shadows.
To disable shadows we must set the skin parameter shadowing to the value false.
PlantUML will then not create shadows on elements.
In the following sample PlantUML definition we use the value false for the skin parameter shadowing:
Continue reading →
The default colors of PlantUML use red and yellow to draw the diagram elements.
If we want our diagram to be in black, grey and white we can simply set skin parameter monochrome to true.
The generated graphical diagram will now have black, grey and white colors.
In the following sample PlantUML definition we set the diagram skin parameter monochrone to true:
Continue reading →
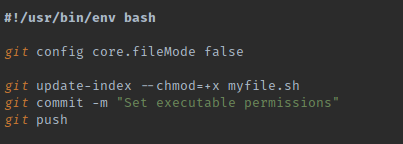
You can check files with correct permissions into Git to be able to run them on the continuous integration server right after checkout.
Setting the right properties in the git-index will force Git to checkout the file and set the right file permissions.
Set the core.fileMode in the git configuration to false.
The means: Do not ignore the file mode. Then update the git-index with --chmod for your file, commit and push the file to the repository.
Continue reading →
Drawing diagrams with PlantUML is fun and easy.
We use text to describe the diagram and the we get a graphical representation.
Especially in combination with Asciidoctor with PlantUML integration we have a winning combination to write technical documentation.
Because our text is transformed into a graphical format like PNG we don't have much influence on the layout.
There are options to indicate positions of elements, but we can also use the length of lines to influence the position of elements.
In the following sample we have a PlantUML diagram description with standard lines.
We use two hyphens (--) to define a line:
Continue reading →
Combining Angular2 and Spring Boot is a great way of getting up and running quickly with a new web application. However, it can be challenging to fit all the different pieces together in the beginning. In this blog post we will create a new project that is easy to build and run across different environments. The goal is to create a minimal, but runnable, application with as little dependencies and setup as possible. You can then start expanding the application however you see fit. We will create the Angular2 application using angular-cli. This allows us to easily generate a new project with a clear structure. This will also make it easy to add new elements to our Angular2 application. When adding new elements with angular-cli, we will maintain the same structure and wire the new elements together automatically. Angular-cli is an npm module, so it requires Node and npm to install and run. Make sure to install a recent version of both of these applications before continuing with the steps below. We will use Maven as the overall build manager for our application. The steps should be easy to follow and will not require a lot of work. However, you can get the result directly in this GitHub repository if you want to. There is a seperate commit for every step.
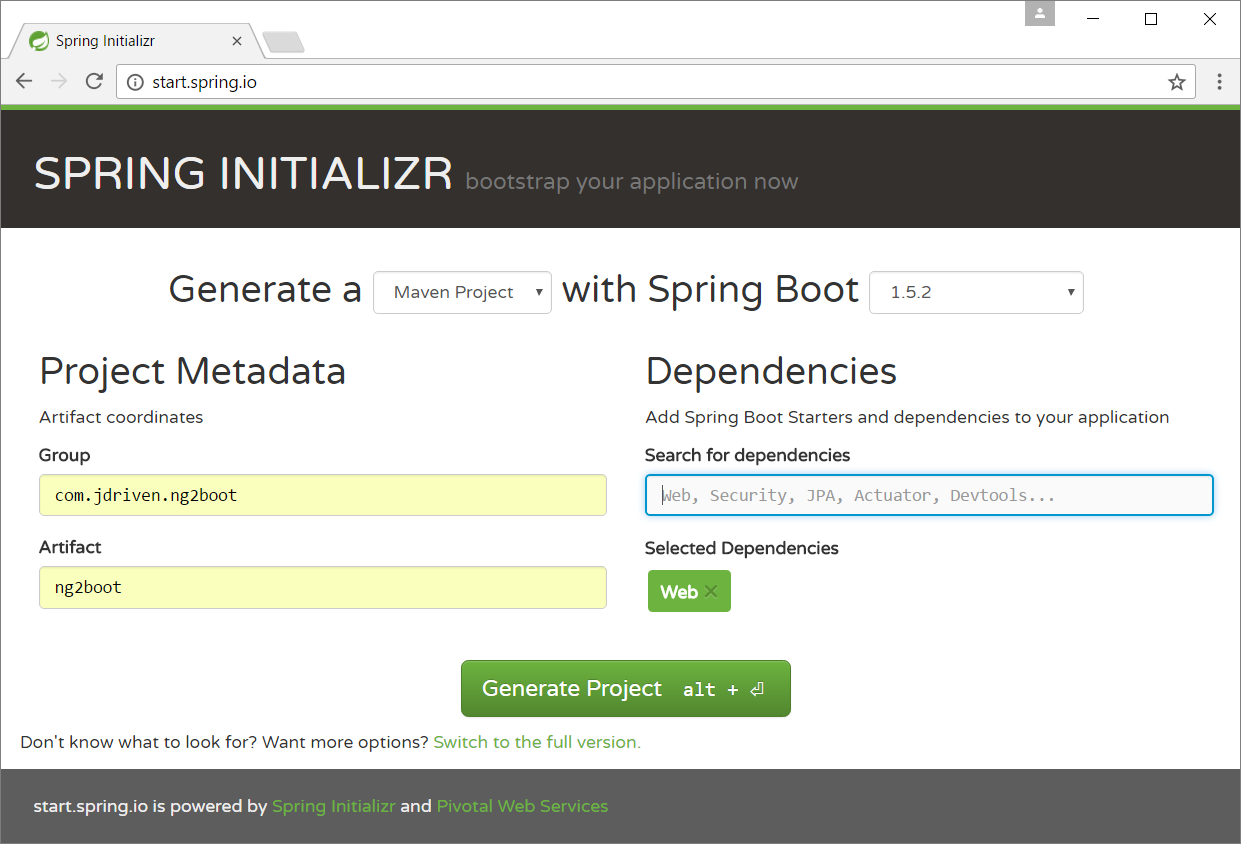
The first step is to generate a new Spring Boot project at https://start.spring.io. I've used the values in the screenshot below. Of course you can use your own group and artifact ids. We need at least the Web plugin to let Spring Boot serve the Angular2 application. If you already know you need more dependencies for your project, feel free to add them. Click on Generate Project to download the zip file with your new Spring Boot project. Extract the zip file somewhere on your computer. Then open a command prompt and go to the newly created project directory.
Continue reading →
IntelliJ IDEA 2016.3 introduces the option to delegate the IDE build and run actions to Gradle. So if we invoke the Build Project action from the Build menu IntelliJ IDEA invokes the correct tasks using Gradle. Also the Run and Debug actions from the Run menu are executed with Gradle.
If we want this behaviour we need to changed the preferences of IntelliJ IDEA. We must open the preferences dialog window and then go to Build, Execution, Deployment | Build Tools | Gradle | Runner. Here we check the option Delegate IDE build/run actions to gradle and we close the window:
Continue reading →
